Overview
Every asset goes through a lifecycle – purchased, deployed, maintained, repaired, and eventually retired. Lifecycle Tracking records each stage change with dates, notes, and the person who made the change.
Stages like “In Warehouse”, “Assigned”, “Under Repair”, and “Disposed” map to your business process so managers can see how long assets spend in each phase.
How It Works
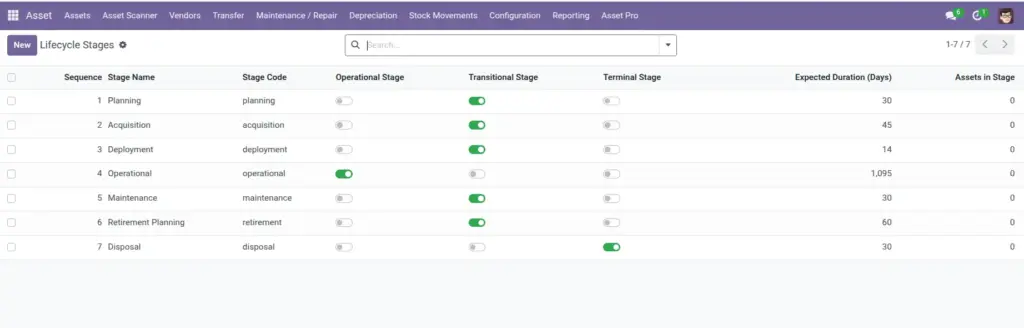
Lifecycle stages are configured under Asset Pro Configuration. Each stage has a sequence, expected duration, and optional auto-transition rules. When an asset moves to a new stage, a history entry is created.
From the asset form, use lifecycle action buttons to advance or revert stages. The history tab shows a complete timeline – useful for warranty disputes and performance reviews.
Step-by-Step Guide
- Review default lifecycle stages at Asset Pro > Configuration > Lifecycle Stages.
- Open an asset record and find the lifecycle section or history tab.
- Click the appropriate action button to move the asset to the next stage (e.g., Assign, Return to Warehouse, Send to Repair).
- Enter any required notes explaining the stage change.
- View the lifecycle history to see all past transitions with dates and users.
- Managers can run reports on average time spent in each stage to identify bottlenecks.
Fields Table
| Field Name | Description | Example |
|---|---|---|
Stage Name |
Name of the lifecycle phase. |
Under Repair |
Stage Code |
Short internal code for the stage. |
repair |
Sequence |
Order of stages in the lifecycle flow. |
4 |
Expected Duration (Days) |
Typical time an asset stays in this stage. |
14 |
Operational Stage |
Whether the asset is actively in use. |
No |
Terminal Stage |
Whether this is an end-of-life stage. |
No |
Mapped Asset Status |
Linked asset status value. |
Under Repair |
Transition Date |
Optional sample records after install. |
Present or not, per package |
User access groups |
When the asset entered this stage. |
2025-03-15 |
Transition Notes |
Reason or context for the change. |
Screen replacement needed |
Field Explanations
Stage Name
Use plain language your team understands – “Under Repair” not “Stage 4”.
Stage Code
Used internally by the system. Do not change codes after assets have used them.
Sequence
Determines the natural order of stages in reports and dashboards.
Expected Duration (Days)
Set realistic averages so overdue alerts are meaningful.
Operational Stage
Mark stages like “Assigned” as operational – they count as active assets.
Terminal Stage
Mark “Disposed” or “Destroyed” as terminal – no further transitions allowed.
Mapped Asset Status
Keeps the asset status field in sync with the lifecycle stage automatically.
Transition Date
Recorded automatically. Used to calculate how long an asset stayed in each stage.
Transition Notes
Encourage staff to add a brief note – invaluable during audits.
Tips (Pro Tips)
- Review lifecycle history before approving disposals – it shows the full story of the asset.
- Set expected durations on repair stages to get alerts when equipment sits too long.
- Train staff to use lifecycle buttons instead of manually changing status fields.
Common Mistakes
- Jumping straight to “Disposed” without going through proper stages – you lose trackable history.
- Changing status manually on the asset form while lifecycle history shows something different.
- Creating too many stages – keep it simple with 50-7 stages most teams can remember.
Visual Reference