

Overview
A smooth start requires two things: people have the right access, and email is configured. User roles in Odoo control who can see recruitment menus, create screenings, train models, and view applicants. Outgoing email lets the system notify your team about high-scoring candidates. Confirm both before rolling out to recruiters.
For End Users (How to Start Using the Module)
If you are a new user, this guide will help you start using the module correctly from “files received” to “menus visible in Odoo”. In many companies, an Odoo Administrator performs the server-side steps (copying files, restarting Odoo, updating the Apps list). If you do not have permission to install apps or change settings, share this section with your Administrator and follow along.
Before you begin :
- You need an Odoo user with Administration / Settings access to install apps and assign user permissions.
- You need access to the Odoo server (or your hosting provider) to copy the addon folder and restart Odoo.
- Know your Odoo version (for example Odoo 16/17/18) so you install a compatible addon build.
Download the latest copy of the addon
Get the latest addon (module) folder from your vendor/developer (usually as a ZIP file). Save it to your computer and extract it. The extracted folder should look like a standard Odoo module:
- It contains a file named __manifest__.py (required).
- It may contain subfolders like models, views, security, data, static.
Check: Do not upload a “double folder” by mistake (example: module/module/__manifest__.py). Odoo must see __manifest__.py directly inside the module folder.
Upload/copy the addon folder into the Odoo addons directory
Copy the entire module folder (do not rename it) into one of these locations on your Odoo server:
- addons (Odoo’s standard addons folder)
- custom_addons (recommended for custom/third‑party modules)
Important: Odoo will only detect the app if: (1) the full module folder is present, (2) the folder name is correct, (3) your Odoo configuration includes that path in addons_path.
If you are using hosting, you may need to upload the addon via your hosting panel or ask the hosting provider to place it on the server.
Restart the Odoo service
Restart Odoo so it reloads Python code and re-reads the addons directories. If you skip this step, Odoo may not detect the new module.
Examples (depends on your setup): restart the system service, restart the Docker container, or use your hosting control panel’s “Restart” button.
Enable Developer Mode
In Odoo, go to Settings and activate Developer Mode (also called Developer mode (debug)). This makes technical options available and helps you find the “Update Apps List” action.
- If you see a bug icon / debug menu, developer mode is enabled.
Update the Apps list
Go to Apps and click Update Apps List. This tells Odoo to re-scan your addons/custom_addons folders and show newly added modules.
Tip: If you do not see the button, developer mode is usually required, or your user may not have enough permissions.
Search the addon in Apps and install it
In Apps, search by the module name (or related keywords).
- If you do not see it, remove the Apps filter (some Odoo versions hide “technical” modules by default).
- Try searching with different keywords (module name, feature name, vendor name).
When you find it, open the app card and click Install. Wait for installation to complete.
During installation: Odoo may install required dependencies (other modules) automatically. This is normal.
Demo data (if included) may be installed automatically
If your database has demo data enabled and the addon provides demo records, Odoo may create sample configuration/data during installation. This is useful for learning; for production databases you may prefer to disable demo data.
- Learning / testing database: demo data can help you understand menus and workflows quickly.
- Production database: avoid demo data so your real records stay clean.
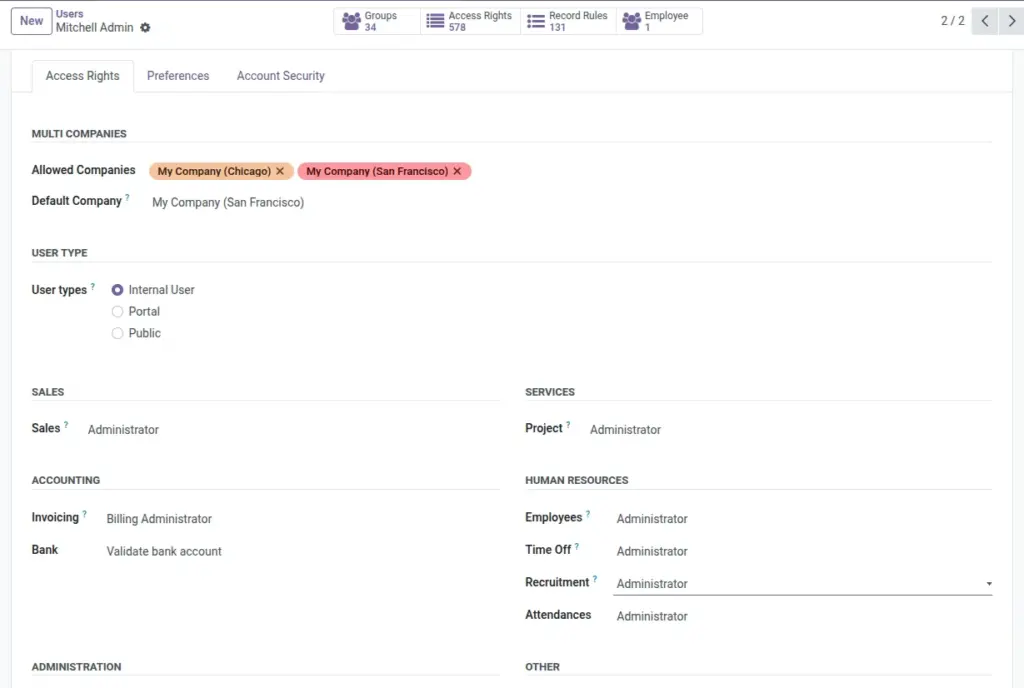
Give users the required permissions (access rights)
After installation, menus can still be hidden until access is granted:
- Go to Settings → Users & Companies → Users
- Select the user who needs access
- Under Access Rights, enable the needed HR/Recruitment and module-related permissions
- Click Save
What to expect: Some users may need to log out and log in again for new access rights to take effect.
Refresh Odoo and confirm the menus are visible
Refresh your browser (log out/in if required) and check the main menu/app switcher. You should now see the module’s menu and features.
- If the menu still does not appear, review the troubleshooting checklist below.
Refresh Odoo
Reload your browser (refresh the page). Then open the app menu and check for the new Asset menus.
Why refresh helps: it updates what your browser shows after installation and permission changes.
Troubleshooting (When you cannot find the app or menus)
- The module does not appear in Apps search:
- Confirm the module folder is in the correct addons/custom_addons directory and contains __manifest__.py.
- Confirm the server configuration includes the folder in addons_path.
- Restart Odoo, then run Update Apps List again.
- Remove the Apps filter in the Apps screen and search again.
- The module installs, but menus/features are missing:
- Assign the correct Access Rights to the user (HR/Recruitment + module permissions).
- Have the user log out and log back in, then refresh the browser.
- Installation fails with an error:
- Check that the addon version matches your Odoo version.
- Ask your Administrator to check the Odoo server logs for the exact error message.
How It Works
Odoo checks user roles to decide what each person can see and do. Recruiters and hiring managers need HR/Recruitment permissions to access AI Resume Screening, create/edit screenings, train models, and screen applicants. For notifications, Odoo sends messages through your configured outgoing mail server (SMTP). When an applicant exceeds your threshold, the system fills the chosen email template and delivers it to the recipients you define.
Step-by-Step Guide
- Admin : Assign users to HR/Recruitment roles in Odoo.
- Admin : Configure outgoing email (SMTP) in Settings → Technical → Email.
- Team : Verify you can open AI Resume Screening and see job applicants.
Fields Table
| Field Name | Description | Example |
|---|---|---|
User Role |
Determines access to recruitment features. |
Recruitment Manager |
Outgoing Mail Server |
Allows system to send emails. |
smtp.company.com |
Email Template |
Template used for notifications. |
AI Resume High Score |
Field Explanations
User Role
Determines who can access AI Resume Screening and related actions.
Outgoing Mail Server
SMTP settings used to send alert emails to your team.
Email Template
The predefined message used for notifications.
Tips
- Create a group mailbox (e.g., [email protected]) for alerts.
- Review access rights quarterly.
Common Mistakes
- Missing email setup → alerts never arrive.
- Too-broad access → unnecessary data exposure.
Image