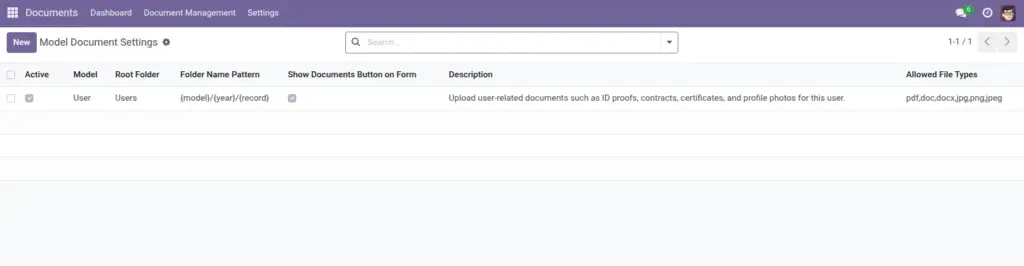
Overview
Model Document Settings is an admin/manager setup screen that helps your company keep documents organized around real business work (Sales Orders, Projects, Invoices, etc.).
Use this feature when you want:
- Consistency: every record stores documents in the same folder pattern.
- Less user confusion: users don’t have to guess where to upload.
- Cleaner audits: it’s easier to find “all documents for this Sales Order”.
- Simple rules: optional file type restrictions per business area.
Real-life example: For Projects, you set Root Folder “Projects” and pattern {year}/{record}. Now every new project gets its own folder automatically (for specs, drawings, sign-offs), without users creating random folder names.
How it works
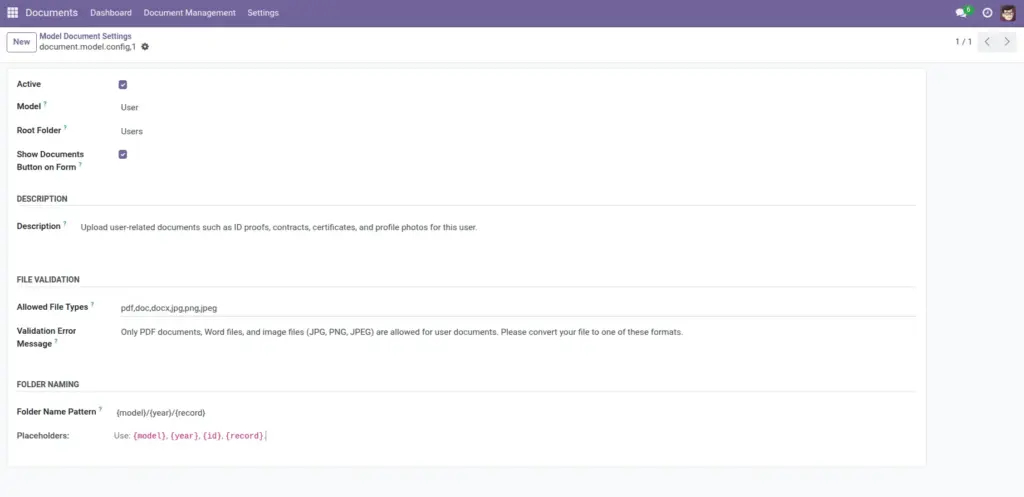
- You select a Model (a business screen like Sales Order, Invoice, Project).
- You choose a Root Folder where all folders for that model will be created.
- You set a Folder Name Pattern to generate folders consistently (example:
{model}/{year}/{record}). - You can show or hide a Documents button on the business record form (if enabled in your system).
- You can restrict what file types users may upload for that model (optional).
Real-life example: For Sales Orders, store everything under “Sales Documents”, then create folders like: “sale.order / 2026 / SO0241 – ACME”.
Step-by-step guide
- Go to Documents → Settings → Model Document Settings.
- Click Create.
- Select the Model (example: Sales Order).
- Select a Root Folder (example: Sales Documents).
- Set the Folder Name Pattern (example:
{model}/{year}/{record}). - Turn on Show Documents Button on Form if you want easy access from the business record.
- (Optional) Set Allowed File Types (example:
pdf,docx,xlsx). - (Optional) Set a friendly Validation Error Message.
- Click Save.
Who should do this?: Ask your admin to confirm the chosen model and naming pattern before rolling out to all users, so you don’t create duplicate or confusing folder structures.
Fields table (Model Document Setting)
| Field Name | Description | Example | |
|---|---|---|---|
Active |
Enable/disable this configuration. |
On |
|
Model |
The business screen this rule applies to |
Sales Order |
n |
Root Folder |
Where all folders for this model will be created. |
Sales Documents |
o |
Show Documents Button on Form |
Shows a Documents button on the business record (if your setup supports it). |
Yes |
|
tFolder Name Pattern |
How folders will be named using placeholders. |
s{model}/{year}/{record} |
|
Description |
Help text shown to users during upload (what documents belong here). |
Upload signed PO, delivery note, invoice |
|
Allowed File Types |
Comma-separated extensions allowed for upload (blank = allow all). |
pdf,docx,xlsx |
|
Validation Error Message |
Custom message shown when a user uploads a blocked file type. |
Please upload PDF or Word files only. |
Field Explanations
Active
Turn off a configuration without deleting it.
Model
Choose carefully; one model typically gets one configuration.
Root Folder
Pick a stable folder that will not be deleted or moved.
Show Documents Button on Form
Best for end users — fewer clicks.
Folder Name Pattern
Keeps folder naming consistent. Common placeholders: {model}, {year}, {id}, {record}.
Description
Explain what users should upload (this reduces messy documents).
Allowed File Types
Use this for compliance (example: block .exe or unapproved formats).
Validation Error Message
Write a helpful “what to do instead” message.
Tips
- Keep patterns human-friendly: include the record name (
{record}) so folders are readable. - Agree on a single root folder per department (“Sales Documents”, “HR Documents”).
- Start with “allow all file types” unless you have a clear rule — too strict can block users.
Common mistakes
- Changing patterns after rollout: It can create inconsistent folders across years/teams.
- Choosing the wrong root folder: If it’s moved or deleted, document organization breaks.
- Over-restricting file types: Users may need images or scans; confirm business needs first.
Image