A complete, step-by-step guide to install Advance Dashboard in Odoo – written for new users with no technical background.
Overview
Advance Dashboard is an Odoo application that lets you build interactive dashboards with charts, KPI numbers, and data tables – all connected to your real business data. Before you can use it, the app must be installed on your Odoo server and activated for your company.
This guide walks you through the entire setup process from start to finish. You do not need to be a developer. If you can download a file, copy a folder, and click buttons inside Odoo, you can follow along.
By the end of this chapter, you will have:
- Installed the Advance Dashboard addon on your Odoo server
- Activated the app inside Odoo
- Given the right people permission to use it
- Confirmed that the Advance Dashboard menu appears in your Odoo home screen
Who should do this?
Usually your Odoo administrator, IT person, or whoever manages your Odoo server does the installation (Steps 1–6). Giving user permissions (Steps 7–9) can be done by any administrator inside Odoo.
How It Works
Odoo applications (also called addons or modules) are delivered as a folder containing all the files the app needs. To use Advance Dashboard, that folder must be placed on the same computer (or server) where Odoo is running.
Here is what happens behind the scenes during setup:
- Download – You get the latest copy of the addon folder (named
odoo_advance_dashboard). - Upload / Copy – The folder is placed inside your Odoo addons directory so Odoo can find it.
- Restart – Odoo is restarted so it scans for new addons.
- Activate Developer Mode – This unlocks the “Update Apps List” button, which tells Odoo to look for newly added addons.
- Update Apps List – Odoo refreshes its catalogue of available applications.
- Install the App – You search for “Advance Dashboard” and click Activate. Odoo installs the app and its data.
- Demo Data – If the addon includes sample dashboards, they may be loaded automatically during installation (or you can import them later from Settings).
- User Permissions – Each person who should use dashboards needs the correct access rights assigned to their user account.
- Verify – After permissions are set, users refresh Odoo and see the Advance Dashboard menu on their home screen.
Step-by-Step Guide
Step 1 – Download the Latest Copy of the Addon
Download the most recent version of the
Advance Dashboard
addon from your purchase source (Odoo Apps Store, your vendor, or your development team). You should receive a ZIP file. Extract (unzip) it on your computer. Inside, you will find a folder named odoo_advance_dashboard. This is the folder you need – keep it intact; do not rename it.
Step 2 – Upload the Addon Folder to Your Odoo Server
Copy the entire odoo_advance_dashboard folder to the addons directory on the machine where Odoo runs. This folder is usually called addons or custom_addons.
Where to put it:
- Odoo.sh / hosted Odoo: Upload via Git or the platform’s file manager into your custom addons path.
- Windows server: Copy to something like
C:\odoo\custom_addons\odoo_advance_dashboard - Linux server: Copy to something like
/opt/odoo/custom_addons/odoo_advance_dashboard
Make sure the folder structure looks like this:
custom_addons / odoo_advance_dashboard / __manifest__.py (and other files inside).
__manifest__.py directly inside odoo_advance_dashboard.Step 3 – Restart the Odoo Service
After copying the folder, restart Odoo so it picks up the new addon. The method depends on how Odoo is installed:
- Windows service: Open Services, find the Odoo service, and click Restart.
- Linux (systemd): Run
sudo systemctl restart odooin the terminal. - Docker: Restart the Odoo container.
- Odoo.sh: Push your code – the platform restarts automatically.
Wait until Odoo is fully running again before continuing. This usually takes 30 seconds to 2 minutes.
Step 4 – Turn On Developer Mode in Settings
Log in to Odoo as an administrator. Go to Settings (the gear icon on the main menu). Scroll to the very bottom of the Settings page. Click Activate the developer mode (sometimes shown as “Activate Developer Mode”).
Developer mode unlocks extra tools that administrators need – including the ability to update the apps list. It does not change anything visible to regular employees; it only shows additional options for admins.
?debug=1 to the end of your Odoo URL in the browser address bar, then press Enter. Example: https://mycompany.odoo.com/web?debug=1Step 5 – Update the Apps List
With developer mode active, go to the Apps menu (click the grid icon on the Odoo home screen, then select Apps). Click the Update Apps List button in the top menu bar. Odoo will ask you to confirm – click Update.
This step tells Odoo to scan the addons folder again and register any new applications it finds – including Advance Dashboard. It may take a few seconds. When finished, you are ready to install the app.
Step 6 – Search for the Addon and Activate It
Still on theAppspage, clear any filters at the top (remove “Apps” filter if active, so you see all modules). In the search bar, type Advance Dashboard. You should see the app appear with the title “Advance Dashboard – Interactive KPI Builder, Charts, TV Mode & Custom SQL for Odoo”. Click the Activate button (or Install, depending on your Odoo version).
Odoo will install the module. This creates the database tables, menus, security rules, and default settings. Installation typically takes less than a minute. When done, the button changes to Installed or shows a green checkmark.
Step 7 – Demo Data (Sample Dashboards)
Advance Dashboard comes with 70 ready-made sample dashboards covering Sales, CRM, HR, Inventory, Accounting, and many more Odoo apps. Some demo data may load automatically when you install the app.
If you do not see sample dashboards after installation, you can import them manually later:
- Go to Settings
- Find the Advance Dashboard section
- Click Import All Demo Data to load all 70 sample dashboards
- Or choose a specific app (e.g., Sales, HR) and click Import Selected Addon Demos
Demo data is safe to import multiple times – existing dashboards are kept, and only missing items are added.
Step 8 – Give Users Permission to Access Advance Dashboard
By default, all internal Odoo users receive basic Advance Dashboard User access when the app is installed. However, if a person cannot see the menu, you need to check their permissions manually.
How to assign permissions:
- Go to Settings → Users & Companies → Users
- Open the user account (e.g., “John Smith”)
- Click the Access Rights tab
- Scroll down to find the section called Advance Dashboard
- Choose the right level:
- User – Can view dashboards, change date filters, export PDF, and use TV mode
- Manager – Can do everything a User can, plus create dashboards, add widgets, configure SQL queries, and manage access
- Click Save
Repeat for every person who needs access. Administrators (Settings access) automatically get Manager rights.
Step 9 – Refresh Odoo and Confirm the Menu Appears
After saving user permissions, ask the user to refresh their browser (press F5 or Ctrl+R). They should now see Advance Dashboard on the Odoo home screen (the main app grid).
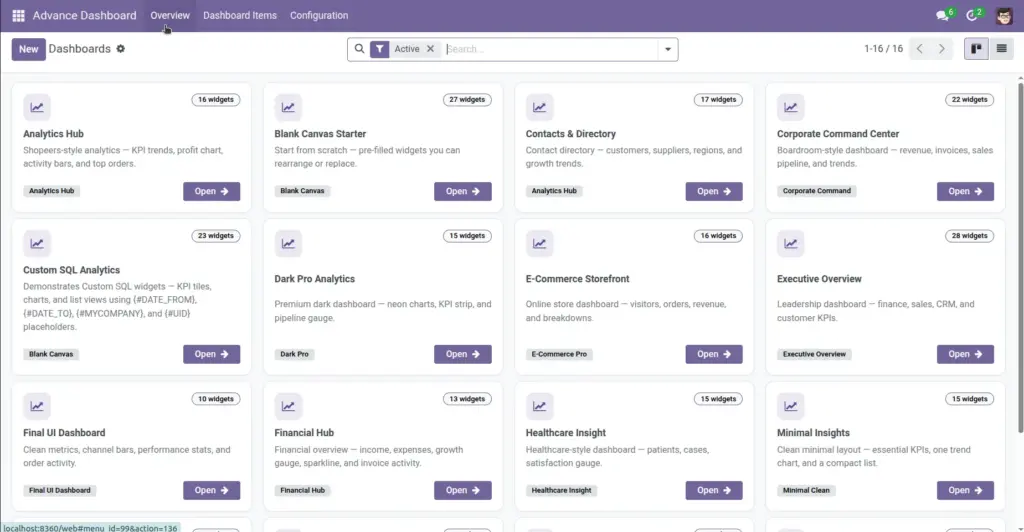
When they open it, they will find:
- Overview – List of all dashboards they can access
- Dashboard Items – Widget list (visible to Managers only)
- Configuration → Import Dashboard – Import shared dashboards (Managers only)
Click any dashboard and press Open Dashboard to see it live. If the menu appears and dashboards open correctly – congratulations, your setup is complete!
Setup Checklist – Key Items at a Glance
Use this table as a quick reference while you work through the setup steps above.
| Item | Description | Example |
|---|---|---|
Addon Folder Name |
The exact name of the module folder you copy to the server |
odoo_advance_dashboard |
Addons Directory |
The folder on the server where custom Odoo apps are stored |
/opt/odoo/custom_addons/ |
Developer Mode |
Admin setting that unlocks “Update Apps List” and advanced tools |
Settings → bottom of page → Activate the developer mode |
Apps Search Term |
What to type in the Apps search bar to find the module |
Advance Dashboard |
User Permission |
Basic access – view dashboards, filters, PDF, TV mode |
Advance Dashboard → User |
Manager Permission |
Full access – create, edit, SQL, import/export, manage access |
Advance Dashboard → Manager |
Main Menu Name |
The app name shown on the Odoo home screen after installation |
Advance Dashboard |
Demo Data Import |
Optional step to load 70 sample dashboards after installation |
Settings → Advance Dashboard → Import All Demo Data |
Field Explanations
Here is a plain-language explanation of every item in the table above.
Addon Folder Name
This is the technical folder name of the application. Odoo looks for this exact folder name inside your addons directory. Do not rename it – if you rename the folder, Odoo will not recognise the app.
Addons Directory
Think of this as the “apps library” on your Odoo server. Every Odoo module (Sales, Inventory, Advance Dashboard, etc.) lives in this folder. Your server administrator configures which folder Odoo reads from. Common names are addons and custom_addons.
Developer Mode
A special administrator view in Odoo that reveals extra buttons and settings. You need it temporarily to run “Update Apps List” after adding a new addon. It is safe to leave on for admins, but regular employees do not need it.
Apps Search Term
The words you type in the Apps screen to locate Advance Dashboard. If the exact name does not appear, try searching just “Dashboard” or “Advance” and remove all filters at the top of the Apps page.
User Permission
The standard access level for employees who need to view dashboards. They can open dashboards, switch date ranges, print PDFs, and use TV mode. They cannot create new dashboards or change widget settings. Most of your team will have this level.
Manager Permission
The full access level for people who build and manage dashboards. Managers can create dashboards, add and edit widgets, write custom SQL queries, import/export dashboards, and control who can see each dashboard. Give this to team leads, analysts, and administrators.
Main Menu Name
After installation, “Advance Dashboard” appears as a new app icon on the Odoo home screen. This is the entry point for everything in the module – viewing dashboards, managing widgets, and importing shared layouts.
Demo Data Import
An optional feature that loads 70 pre-built sample dashboards so you can explore the app immediately. You can import all demos at once or pick specific categories (Sales, HR, CRM, etc.). This is especially helpful for new users who want to see what is possible before building their own dashboards.
Tips
- Always use the Odoo 17 version of the addon. Check the version number in the download – it should start with
17.0. - Before installing on a live/production system, test the addon on a staging or copy database first.
- After installation, import demo dashboards from Settings to explore features before building your own.
- If you manage multiple companies in one Odoo database, dashboards can be assigned per company – set this when creating each dashboard.
- Keep a backup of your database before installing any new addon. This is good practice for any Odoo module.
- If only one person cannot see the menu, the issue is almost always their user permissions – not the installation itself.
- Administrators automatically receive Manager access. You do not need to assign it manually for admin accounts.
Common Mistakes
- Putting the ZIP file instead of the folder – Odoo cannot read a ZIP file. You must extract it and copy the
odoo_advance_dashboardfolder. - Nesting the folder too deep – If you copy
odoo_advance_dashboard/odoo_advance_dashboard/(folder inside folder), Odoo will not find it. The__manifest__.pyfile must sit directly inside the firstodoo_advance_dashboardfolder. - Skipping the Odoo restart – After copying the addon, you must restart Odoo. Without a restart, the new app will not be detected.
- Forgetting to update the apps list – Even after restart, you must click “Update Apps List” in the Apps menu (with developer mode on) before the app appears in search.
- Searching with the “Apps” filter active – This filter hides modules that are not yet installed. Remove it to see Advance Dashboard in search results.
- Expecting demo data without related apps – A “Sales Performance” demo dashboard needs the Sales app installed. Without it, widgets will show zero or empty data.
- Not saving user permissions – After changing access rights on a user form, always click Save. Changes do not apply until you save.
- Not refreshing the browser – After permission changes, users must refresh their browser (F5) to see the new menu. Simply navigating away is not enough.
Image