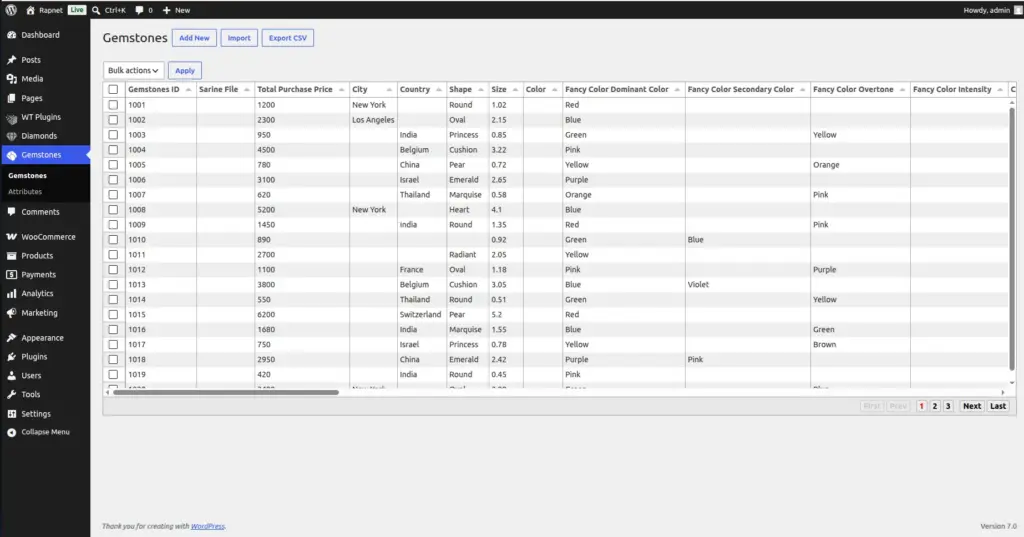
Add, edit, and remove gemstones – such as sapphires, rubies, and emeralds – from your store, using the same simple workflow as diamonds.
Overview
In addition to diamonds, RapNet For WooCommerce lets you list gemstones in their own separate section of your shop, managed the same straightforward way as your diamond inventory.
How It Works
Gemstones are kept completely separate from diamonds – they have their own inventory list, their own admin screen, and their own set of Attributes (Shape, Color & Clarity Options) so you can define the specific details that matter for gemstones (such as type, origin, or color) rather than diamond-only terms like clarity grade.
Step-by-Step Guide
1. Open the gemstone list
In your WordPress admin, go to Gemstones → Gemstones.
2. Click Add New
Click Add New above the list to open a blank gemstone form.
3. Fill in the gemstone's details
Enter the stone’s type, carat weight, color, price, and any other detail fields your store tracks (the exact fields available match whatever Attributes you’ve set up – see Shape, Color & Clarity Options).
4. Save the gemstone
Click Save. It appears at the top of your gemstone list immediately and becomes visible on your shop’s front end.
5. Edit or remove a gemstone
Click any row to edit it, or use the delete control next to a row to remove it from your active inventory.
Fields Table
| Field Name | Description | Example |
|---|---|---|
Gemstone ID |
A unique reference number automatically assigned to every gemstone you add. |
1, 2, 3… |
Type |
The kind of gemstone. |
Sapphire, Ruby, Emerald |
Color |
The gemstone’s color description. |
Blue, Pigeon Blood Red |
Price |
The gemstone’s base price before your markup is applied. |
1200 |
Field Explanations
Unlike diamonds, which use an ID you can type in (like a certificate number), the Gemstone ID is generated automatically for you and simply counts upward – you never need to invent or enter it yourself.
The remaining fields you see on the Add/Edit screen come directly from the Attributes you have defined for gemstones (Shape, Color & Clarity Options) – set those up first if you want a specific detail (like “Origin” or “Treatment”) available when adding stock.
Just like diamonds, the Price you enter here is the base price; your markup setting from Selling Price & Markup is applied automatically wherever the gemstone’s price is shown to shoppers.
Tips
- Set up your Gemstone Attributes (Shape, Color & Clarity Options) before adding your first gemstone, so all the detail fields you need are available on the form.
- Keep gemstone type and color spelling consistent so shop filters and search work correctly.
- Use CSV Import (Import & Export (CSV)) if you have a large batch of gemstones to add at once.
Common Mistakes
- Adding gemstones before setting up Attributes, resulting in a form with fewer detail fields than you expected.
- Confusing the Gemstones menu with the Diamonds menu – they manage completely separate inventories.
- Entering the markup amount into the Price field instead of the true base cost.
Image