Welcome! This guide walks you through downloading, installing, and activating the RapNet For WooCommerce plugin on your WordPress website – step by step, in plain language, even if you have never installed a plugin before.
Overview
RapNet For WooCommerce turns your WooCommerce store into a diamond and gemstone shop. Once installed, it lets you list natural diamonds, lab-grown diamonds, and gemstones for sale, and lets your customers search, compare, and buy them – all without turning every single stone into a separate WooCommerce product.
Before you begin, make sure WooCommerce is already installed and active on your site. RapNet For WooCommerce is built to work on top of WooCommerce, so WooCommerce must be running first.
How It Works
Installing a WordPress plugin is simple: you upload one ZIP file, click a button to turn it on, and WordPress does the rest automatically. Unlike some other software, there is no server restart, no separate “developer mode” to enable, and no manual “update app list” step – the moment you activate the plugin, WordPress silently creates everything the plugin needs behind the scenes: its own database tables for diamonds, lab diamonds and gemstones, a hidden placeholder product used for checkout, and a ready-made “RapNet Shop” page on your site.
Step-by-Step Guide
1. Confirm WooCommerce is active
Go to Plugins → Installed Plugins in your WordPress admin. If WooCommerce is not listed or not active, install and activate it first (search for it under Plugins → Add New). RapNet For WooCommerce depends on WooCommerce’s cart, checkout, and order screens to sell diamonds.
2. Download the plugin ZIP file
Get the latest rapnet-for-woocommerce.zip file from the place you purchased or downloaded it. Save it to your Desktop or Downloads folder. Do not unzip it.
3. Upload the plugin
In your WordPress admin, go to Plugins → Add New → Upload Plugin. Click Choose File, select rapnet-for-woocommerce.zip, then click Install Now.
4. Activate the plugin
When the upload finishes, click Activate Plugin. If you missed that screen, go to Plugins → Installed Plugins and click Activate under “RapNet For WooCommerce”. Activation happens instantly – your site does not go offline.
5. Let the plugin set itself up
The very first time it activates, the plugin automatically creates a hidden placeholder product (used to process diamond orders through WooCommerce checkout), a public page called RapNet Shop where your diamonds will be displayed, and the internal database tables that will hold your diamond, lab diamond, and gemstone listings. You do not need to do anything for this step – just wait a few seconds after activating.
6. Find the new admin menus
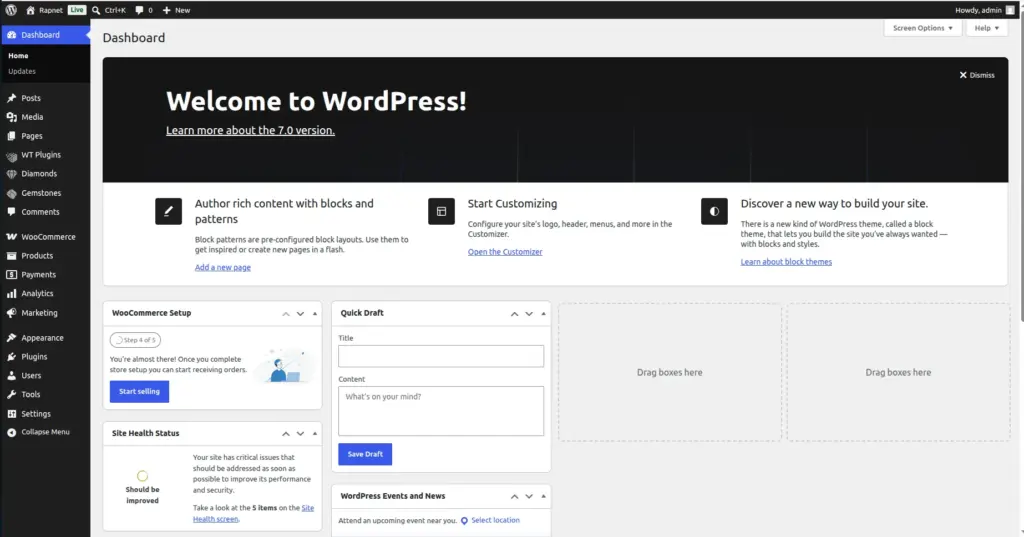
Refresh your browser. Look at the left-hand admin sidebar – you will now see three new menu groups: WT Plugins,Diamonds, and Gemstones.
7. Open the settings screen
Click WT Plugins → Rapnet Settings. This is the plugin’s control room, where you will connect your RapNet account, choose your shop page, and set your pricing markup (covered in the next chapters).
8. Check who on your team can manage the shop
Go to Users → All Users and check each staff member’s Role. Right now, only users with the Administrator role can open the Diamonds and Gemstones management screens (see Staff Access & Permissions for full details), so make sure the right people have that role before they try to add stock.
9. Visit your new shop page
Open your site’s front end and find the RapNet Shop page (its exact web address is shown on the Rapnet Settings screen). It will look empty at first – that’s expected, since you have not added any diamonds or connected the RapNet API yet. The next chapters show you how to fill it with stock.
Fields Table
| Field Name | Description | Example |
|---|---|---|
WooCommerce |
The e-commerce plugin RapNet For WooCommerce is built on top of. Must be installed and active first. |
WooCommerce v8.x, active |
Plugin ZIP file |
The installable package for RapNet For WooCommerce, downloaded from your purchase source. |
rapnet-for-woocommerce.zip |
WT Plugins menu |
New top-level admin menu group added after activation; its “Rapnet Settings” submenu is the main control panel. |
WT Plugins → Rapnet Settings |
Diamonds menu |
New admin menu group for managing natural and lab-grown diamond stock and their attributes. |
Diamonds → Natural Diamonds |
Gemstones menu |
New admin menu group for managing gemstone stock and its attributes. |
Gemstones → Gemstones |
RapNet Shop page |
The public WordPress page auto-created on activation to display your diamond shop to visitors. |
yourstore.com/rapnet-shop/ |
Field Explanations
WooCommerce is the foundation this plugin builds on – it supplies the shopping cart, checkout, and order-management screens that RapNet For WooCommerce reuses to sell diamonds. The plugin does not check for WooCommerce on activation, so if WooCommerce is missing or deactivated later, the shop will stop working correctly without a clear warning – always keep WooCommerce active.
The WT Plugins, Diamonds, and Gemstones menus are where all day-to-day work happens: settings under WT Plugins, and inventory under the other two. If you click directly on one of these three menu icons/group names and see a technical error page, that’s expected on some setups – use one of the items in the flyout submenu instead (e.g. “Rapnet Settings”, “Natural Diamonds”), which always work correctly.
The RapNet Shop page is a normal WordPress page the plugin creates for you automatically so you don’t have to build a shop page from scratch. You can change which page is used for this in Rapnet Settings (see Designing Your Shop Page).
Tips
- Always install and activate WooCommerce first – RapNet For WooCommerce assumes it is already running.
- Keep the plugin ZIP file unextracted when uploading; WordPress unzips it for you automatically.
- After activation, wait a few seconds before clicking around – the plugin needs a moment to create its database tables and shop page.
- Bookmark WT Plugins → Rapnet Settings – you’ll return to it in almost every other chapter.
Common Mistakes
- Activating the plugin before installing WooCommerce. The shop, cart, and checkout screens will not work correctly without WooCommerce running first.
- Unzipping the plugin file before uploading it. Upload the original
.zipfile as-is; WordPress extracts it during installation. - Clicking the top-level “Diamonds” or “Gemstones” menu icon directly. On some setups this shows a technical error page. Always click a specific submenu item instead, like “Natural Diamonds” or “Attributes”.
- Assuming Editors or Shop Managers can manage diamonds right away. Only the Administrator role can open the inventory screens out of the box – see Staff Access & Permissions before assigning stock work to staff.
Image