


This chapter explains how customers add items to their cart, review their order, and complete payment – all within the mobile app shell at /app.
Overview
The cart and checkout flow inside the app works exactly the same as regular WooCommerce – same forms, same payment gateways, same order process. The difference is it all happens inside the clean /app shell, optimized for mobile screens.
Cart
Review selected items, update quantities, apply coupons, see totals.
Checkout
Enter billing/shipping address, select payment method, place order.
Order Confirmation
Thank you page confirming the order number and summary.
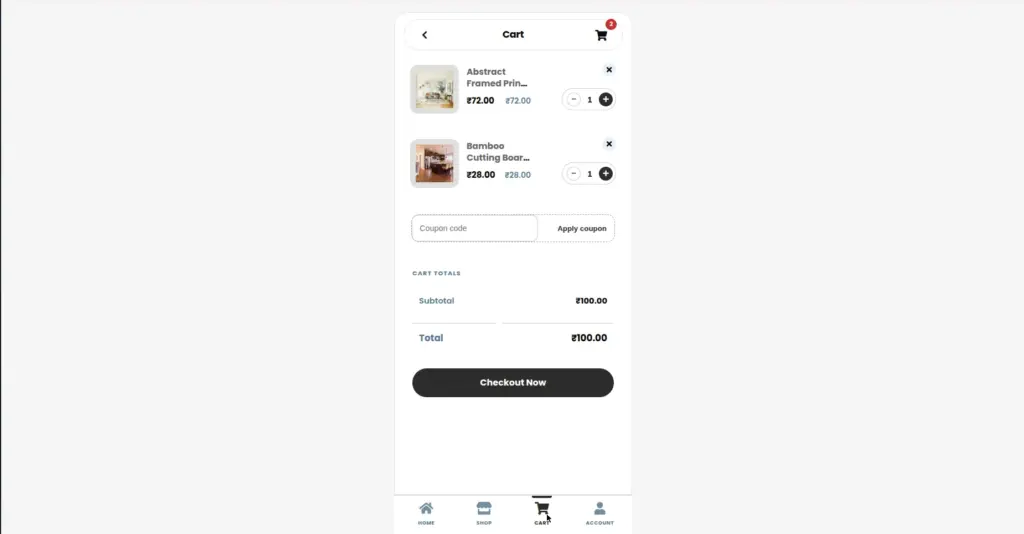
The Cart Page – /app/cart
The cart is where customers review what they have selected before paying. It automatically shows the items from their WooCommerce session – the same cart that is used on the regular website.
yoursite.com/app/cart
| Cart Feature | What the Customer Can Do |
|---|---|
Item List |
See all products added, with image, name, and price |
Quantity Update |
Change the quantity of each item using +/- buttons or typing a number |
Remove Item |
Remove any item from the cart with a single tap |
Coupon Code |
Enter a discount coupon code to apply a discount |
Order Total |
See subtotal, shipping estimate, taxes, and grand total |
Proceed to Checkout |
Tap button to move to the checkout form and complete the order |
Image
The Checkout Page – /app/checkout
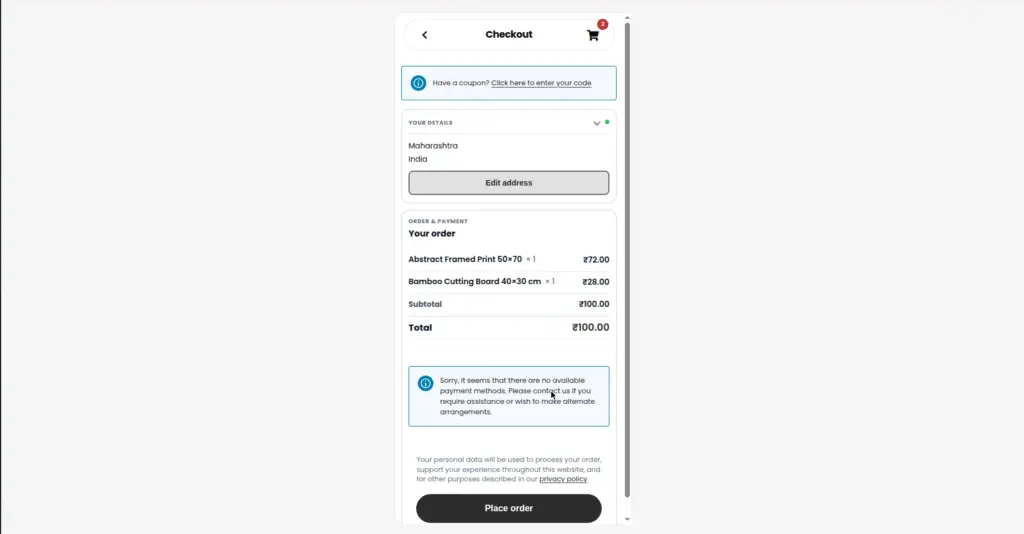
The checkout page is where customers enter their delivery details and pay. It uses standard WooCommerce checkout – all your existing payment gateways (Stripe, PayPal, etc.) work exactly as configured.
yoursite.com/app/checkout
1. Customer fills in their billing details
Name, email address, phone number, and billing address. Returning customers who are logged in may have this pre-filled.
2. Customer fills in shipping address (if different)
They can check a box to use the same billing address for shipping, or enter a separate delivery address.
3. Customer selects a shipping method
Available shipping options appear (Free Shipping, Flat Rate, etc.) based on your WooCommerce shipping configuration.
4. Customer selects a payment method
All your active WooCommerce payment gateways appear here – credit card, PayPal, Stripe, bank transfer, etc.
5. Customer taps "Place Order"
The order is submitted and processed through WooCommerce. The customer sees the order confirmation page.
Image
Order Confirmation
After a successful purchase, the customer sees a Thank You page with their order number, a summary of what they ordered, and confirmation that the order was received. This page appears at /app/checkout/order-received/[order-id].
Order confirmation emails are sent automatically by WooCommerce – same as orders placed through your regular website. No extra setup needed.
Tips
- Test a complete checkout on your phone (using a test payment method) to make sure everything flows smoothly before launching.
- Enable Guest Checkout in WooCommerce settings so customers can buy without creating an account – this reduces friction and increases conversions on mobile.
- Keep your checkout form as short as possible – each extra field increases the chance a mobile user gives up and leaves.
- Offer multiple payment methods – many mobile users prefer PayPal or Apple Pay over entering card details on a small screen.
Common Mistakes
- Not testing payment on mobile. Some payment gateways have mobile-specific issues. Always complete a test transaction on an actual phone before going live.
- Expecting a different checkout than your regular site. The checkout inside /app uses the exact same WooCommerce checkout. Any issues with checkout fields or payments should be fixed in WooCommerce settings, not in the app plugin.