A bin location is the physical address of a product inside your warehouse – the aisle, shelf, and bin position where that product is stored. When a picker opens an order card, they see the bin location of every item in the order, so they can walk directly to the right shelf without searching.
What Is a Bin Location?
Imagine your warehouse has aisles labeled A, B, C – and each aisle has numbered shelves (1, 2, 3…) and individual bins on each shelf (01, 02, 03…). A bin location like B-3-07 means: Aisle B, Shelf 3, Bin 07. Every product in your warehouse lives in one specific bin location.
When you add a bin location to a product in WooCommerce, that location automatically shows on the order card whenever that product is part of an order. The picker reads the card and knows exactly where to go – no searching, no guessing.
How to Add a Bin Location to a Product
Bin locations are stored on individual WooCommerce products. You add them through the product edit screen in WordPress admin.
Go to Products in WordPress Admin
In the WordPress left menu, click Products → All Products. You will see a list of all your WooCommerce products.
Open a product to edit it
Click the product name to open its edit screen, or hover over the name and click the “Edit” link that appears.
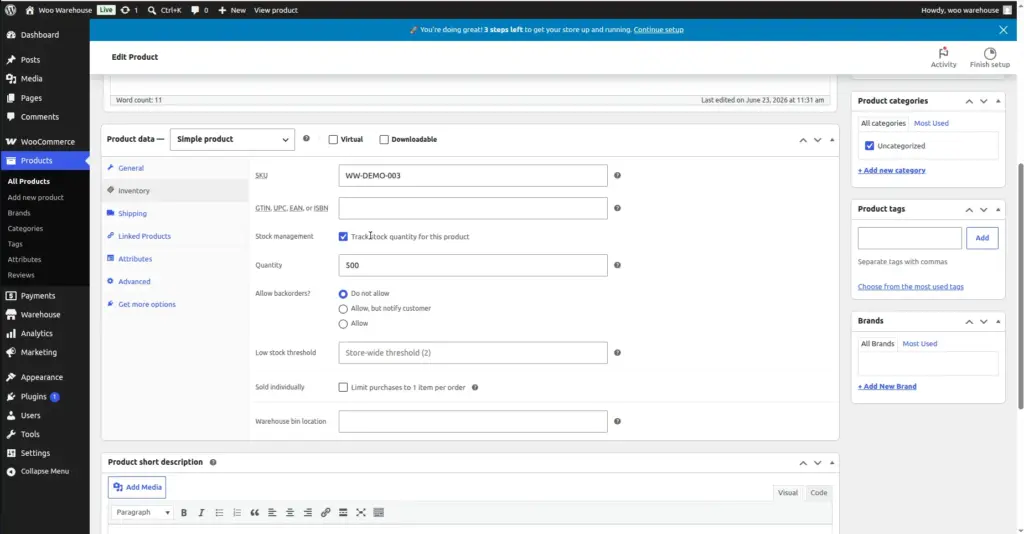
Scroll down to the Product Data section and click "Inventory"
Below the product description, there is a tabbed section called “Product Data.” Click the “Inventory” tab on the left side of this section. This is where stock management settings are kept.
Find the "Bin Location" field and enter the location
Woo Warehouse adds a “Bin Location” field to the Inventory tab. Click the text field and type the bin location for this product. Use a format that matches your warehouse labelling system – for example, A3-12, AISLE-B-SHELF-2, or whatever naming convention your warehouse uses.
Click "Update" or "Save" the product
Scroll up and click the blue “Update” button to save the product. The bin location is now stored and will appear on order cards from this point forward.
Bulk Import Bin Locations via CSV
If you have many products and adding bin locations one by one would take too long, you can import them all at once using a CSV file. This is much faster for large inventories.
1. Prepare a CSV file with two columns
Create a spreadsheet with two columns: one for the product SKU (or product ID) and one for the bin location. Save it as a CSV file.
| sku | bin_location |
|---|---|
TSHIRT-BLUE-M |
A3-12 |
TSHIRT-RED-L |
A3-14 |
HAT-BLACK |
B7-03 |
2. Go to Warehouse → Settings → Bin Import
In the Settings page, find the “Bin Import” section. This is the bulk upload tool for bin locations.
3. Upload your CSV file
Select the CSV file and click Import. The plugin reads the file, matches each row to the product by SKU, and saves the bin location to that product.
4. Verify the results
After import, open a few products to confirm their bin locations were saved correctly. Also check the order board – order cards for those products should now show the bin location.
Bin Location Validation
Woo Warehouse can be configured to require bin locations before an order can advance past certain workflow stages. For example, you might want to prevent an order from moving to “Packing” if any item in the order does not have a bin location set – this would indicate a product that has not been properly catalogued in the warehouse.
By default, the statuses that trigger bin location validation are: Picked, Packing, Ready to Ship, Shipped, and Complete. If you try to move an order to one of these statuses and a product in the order has no bin location, the system will show a warning.
This validation helps ensure your bin location data is complete and up to date. Any product without a bin location needs to be given one before it can flow through the full picking workflow.
Bin Location Field Reference
| Field | Where It Appears | Description | Example |
|---|---|---|---|
Bin Location |
Product edit screen → Inventory tab |
The physical storage location of this product in your warehouse. Free-text field – enter any location code that matches your warehouse system. |
|
Tips for Bin Locations
- Use a consistent, structured format for bin codes – for example, always use the pattern
[Aisle]-[Shelf]-[Bin](e.g.B-04-12). This makes the codes self-explanatory for new pickers. - Add bin locations to all products before going live. An order card without bin locations still works, but it means the picker has to search for items rather than going directly to the bin.
- When you move a product to a new shelf, update its bin location in WooCommerce immediately. Outdated bin locations will send pickers to the wrong place.
- If you sell the same product from multiple bin locations (split stock), enter both locations separated by a comma:
A3-12, A4-02. The picker will check both bins. - Use the CSV bulk import when setting up bin locations for the first time – it is far faster than editing products one by one.
Image