


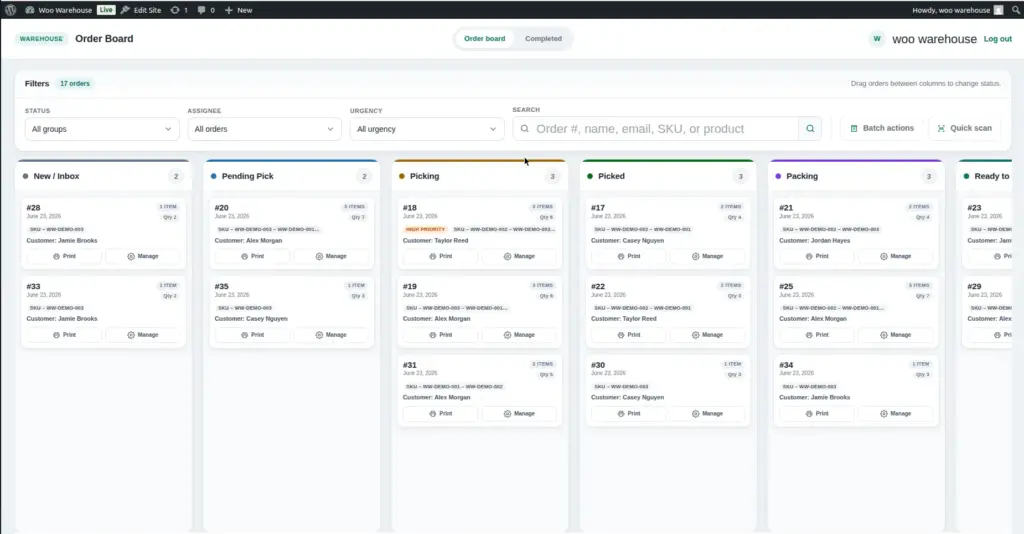
The Order Board is the heart of Woo Warehouse. It shows all active WooCommerce orders as cards arranged in columns – one column per workflow stage. Your team can see the entire fulfillment pipeline at a glance, update order status, assign pickers, add tracking, and print slips – all from one screen.
How to access: Open the Portal Orders URL (found at Warehouse → Settings → Portal URLs). Log in with a Warehouse Staff or Warehouse Manager account. The order board loads automatically.
What Is a Kanban Board?
A Kanban board is a visual way of managing work. Each order becomes a “card.” The board is divided into vertical columns, and each column represents one stage of your warehouse workflow (e.g., Pending Pick, Picking, Packed, Shipped). As an order moves through the fulfillment process, its card moves from left to right across the board – from the first column to the last.
At any moment, you can look at the board and immediately know: which orders need picking, which are being packed, which are ready to ship, and which are done. There is no need to click through lists or open individual orders – everything is visible at once.
Image
Reading an Order Card
Each order appears as a card. Here is what each piece of information on a card means:
| Element on the Card | What It Means | Example |
|---|---|---|
Order Number |
The WooCommerce order number. Clicking it opens the full order detail panel. |
#1042 |
Customer Name |
The name of the customer who placed the order – from the billing or shipping name. |
Jane Smith |
Order Date / Time |
When the order was placed. Helps prioritise older orders that have been waiting longer. |
Today 09:32 AM |
Item Summary |
A short list of the products in the order – name and quantity. Makes it easy to see what needs to be picked without opening the detail view. |
Blue T-Shirt × 2, Red Cap × 1 |
Bin Location |
The shelf/bin location of each product (if you have added bin locations to your products). Shown next to the product name so pickers know exactly where to go. |
|
Assigned Picker |
The name or avatar of the warehouse staff member assigned to this order. If unassigned, this area is blank or shows an “Assign” button. |
John D. |
High Priority Flag |
A red indicator that appears on orders marked as high priority. These need to be fulfilled before other orders in the same column. |
🔴 Priority |
Status Badge |
The current warehouse status shown as a coloured badge matching the column colour. |
Picking (yellow) |
Moving an Order to the Next Stage
There are two ways to move an order forward in the workflow:
- From the Order Detail Panel – Change the Status Dropdown Click anywhere on an order card to open the detail panel. At the top of the panel, find the Warehouse Status dropdown. Click it, select the new status, and it saves automatically. The card moves to the correct column on the board behind the panel.
- From the Card Directly – Click the Status Button Some card layouts show a quick-action button for the next status. Clicking it advances the order to the next stage without opening the full detail panel – ideal for fast-moving warehouse floors.
High Priority Orders
When an order is urgent – a VIP customer, a same-day delivery, or a mistake that needs quick correction – you can mark it as High Priority. High priority orders display a visual alert on their card so they stand out immediately on the board.
- Open the order detail panel Click the order card to open the detail view.
- Click the Priority toggle or checkbox Look for the “High Priority” option and enable it. The card will immediately show the priority indicator.
- The assigned picker receives an email notification If the order is assigned to a picker, they automatically receive an email alert telling them this order is now high priority. See Email Notifications.
The Order Detail Panel
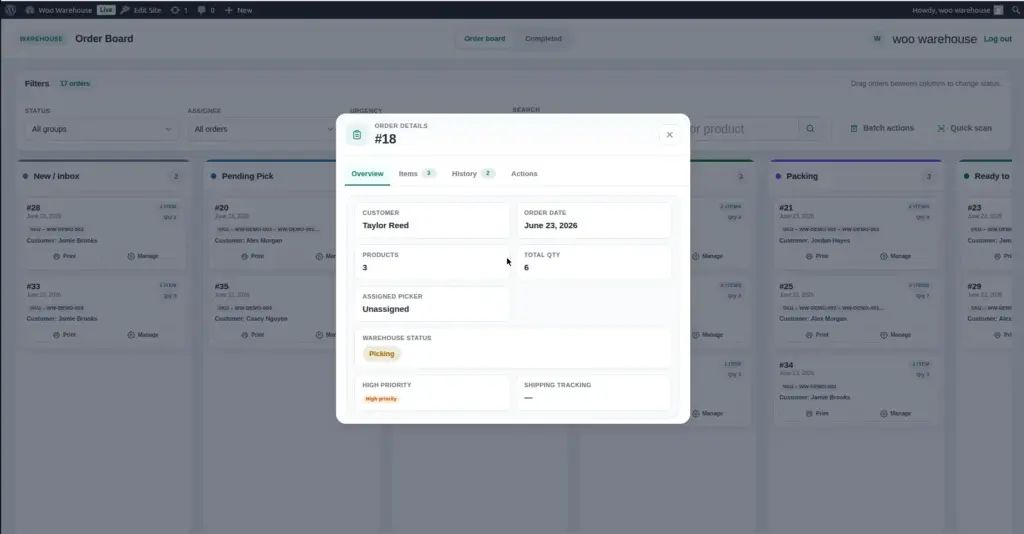
Clicking any order card opens a detail panel (a side panel or modal) with full order information. This is where most of the work happens:
| Panel Section | What You Can Do Here |
|---|---|
Order Items |
See the full list of products, quantities, SKUs, and bin locations for this order. Verify what needs to be picked and packed. |
Customer & Shipping Details |
See the customer’s name, email, phone, and full shipping address. Useful for printing labels or calling a customer about their order. |
Warehouse Status |
Change the current workflow status. Moving to “Complete” removes the order from the active board and sends it to the Completed Orders archive. |
Assign Picker |
Select a warehouse staff member to assign this order to. The assigned picker receives an email notification. |
High Priority toggle |
Mark or unmark the order as high priority. |
Tracking Number |
Add the carrier and tracking number after the order has been shipped. Automatically creates a clickable tracking link. |
Order Notes |
View any notes the customer left at checkout, or any notes added by the WooCommerce admin team. |
Status History |
A log of every warehouse status change – when it happened and who changed it. Useful for tracking issues or disputes. |
Print Slip button |
Print a picking/packing slip for this order to take to the warehouse floor. |
Image
Load More Orders
The board loads orders in batches to keep it fast. The number of orders loaded per batch is controlled by the “Orders per screen” setting (found at Warehouse → Settings → Portal URLs). The default is 20 orders per batch.
If you have more orders than the batch size, a “Load More” button appears at the bottom of each column. Click it to load the next batch. This prevents the page from becoming slow on busy warehouses with hundreds of open orders.
Tips for Using the Order Board
Best practices
- Check the board at the start of every shift – The board gives your team an instant overview of what is waiting, what is in progress, and what needs urgent attention.
- Always assign orders to pickers – Unassigned orders can be picked up by any staff member, which sometimes leads to the same order being picked twice. Assigning orders prevents this confusion.
- Update status in real time – Ask your team to change the status immediately when they start or finish each stage. An accurate board helps managers see bottlenecks as they happen.
- Do not skip statuses – Moving an order directly from “Pending Pick” to “Shipped” skips the picking and packing verification steps. This can lead to unfulfilled items being marked as shipped.
- Use High Priority sparingly – If everything is high priority, nothing is high priority. Reserve the flag for genuinely urgent orders.