


A license plan is a template that controls the rules for every license key it generates. Instead of setting rules on each product individually, you create a plan once and reuse it across many products. Think of it like a pricing tier – “Annual” or “Lifetime” – that defines exactly what your customers get.
What Is a License Plan?
Imagine you sell a software product called “SuperApp.” You want to offer two options: a one-year license that works on up to 2 computers, and a lifetime license that works on up to 5 computers. Instead of manually setting these rules on every product, you create two plans – “Annual” and “Lifetime” – and assign them to products. Every order for a product with the “Annual” plan automatically gets a key that expires in 365 days and allows 2 activations.
Plans sit between your settings and your products. When a customer buys a product, the product’s assigned plan tells the plugin: how long should this key be valid, and how many devices can the customer use it on.
Where to find it: In your WordPress admin, go to License Verification → Plans.
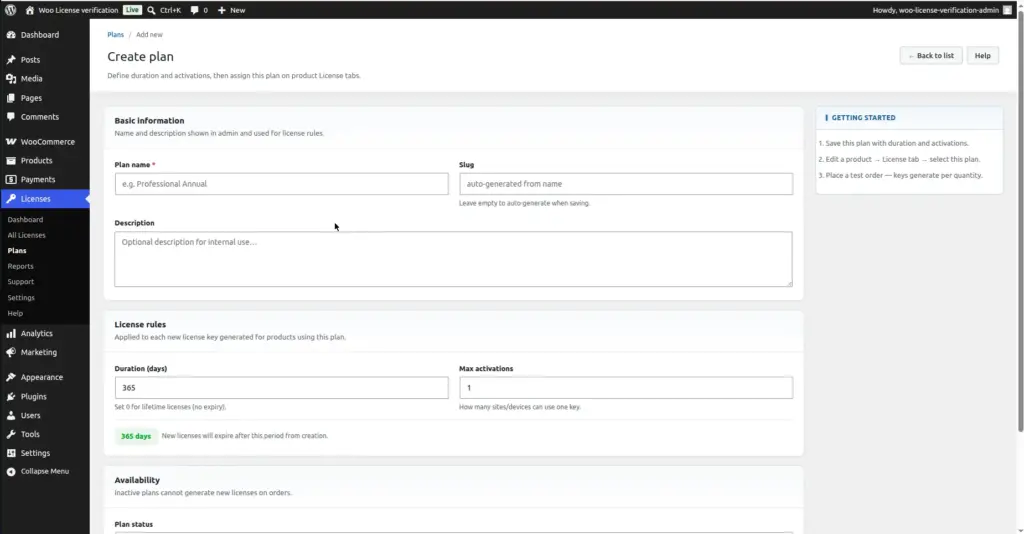
Plan Fields Explained
| Field Name | What It Does | Example |
|---|---|---|
Plan Name |
The label shown in the admin when you are assigning plans to products. Not shown to customers. |
Annual License, Lifetime Plan, Starter |
Slug |
A short, computer-friendly version of the plan name used internally. Auto-generated from the name – you do not need to fill this in. |
annual-license, lifetime-plan |
Description |
Optional notes for your own reference. Helps you remember what this plan is for if you have many plans. Not visible to customers. |
“For individual users – 1 year, 2 machines” |
Duration (days) |
How many days the license key stays valid after it is created. Set to 0 for a lifetime license that never expires. |
365 (1 year), 730 (2 years), 0 (lifetime) |
Max Activations |
The maximum number of computers, domains, or devices a single license key can be activated on at the same time. |
1 (single device), 3 (3 computers), 999 (effectively unlimited) |
Plan Status |
Active plans can generate new license keys when orders are placed. Inactive plans are paused – no new keys are created, but existing keys linked to this plan still work. |
Active / Inactive |
Field Explanations in Plain English
Plan Name
This is how you identify the plan in your admin area. You might create names like “Single Site Annual,” “Multi-Site Lifetime,” or “Developer Edition.” Choose names that clearly describe who the plan is for and how long it lasts, because you will be selecting from this name list when assigning plans to products.
Duration (days)
This is the shelf life of each license key this plan generates. If you set 365, the key your customer receives will expire exactly 365 days after their order is placed. After that date, the key will no longer be accepted when they try to verify or activate it – they would need to purchase again or renew.
If you set the duration to 0, the key never expires. This is what “Lifetime” means – the customer pays once and the key works forever. There is no automatic way to expire a lifetime license short of manually revoking it from the admin.
Max Activations
Think of activations as “seats.” If Max Activations is set to 2, your customer can install and activate your software on up to 2 different computers or websites. If they try to use the same key on a 3rd device, the system will block it. They would need to deactivate one of their existing devices first to free up a slot.
For most individual user software, 1 or 2 activations is standard. For agency or developer licenses, 5–25 is common. Setting a very high number (like 999) effectively makes it unlimited.
Plan Status
When a plan is Active, any product that uses this plan will generate license keys on new orders. When you set it to Inactive, new orders for products using this plan will not generate keys – but any keys that already exist and were generated while the plan was active will continue to work normally. Use Inactive when you want to retire a plan without breaking existing customers’ licenses.
You cannot reduce Max Activations below the number of currently active licenses on that plan. The system protects you from accidentally invalidating licenses that customers are already using.
How to Create a New Plan
1. Go to License Verification → Plans
In your WordPress admin left menu, find License Verification and click Plans. You will see a list of all existing plans (including the sample plans installed automatically).
2. Click "Add New Plan"
There is a button at the top right of the Plans list page. Click it to open the plan creation form.
3. Fill in the Plan Name
Type a clear, descriptive name. You will select from this name later when assigning the plan to products, so make it easy to recognise at a glance.
4. Set the Duration
Enter the number of days the key should remain valid. Type 365 for a one-year license, 730 for two years, or 0 for lifetime (never expires).
5. Set Max Activations
Enter how many devices or domains one key can be activated on. A typical single-user plan uses 1 or 2. An agency plan might use 10 or more.
6. Leave the Status as Active and click Create Plan
Make sure the Status dropdown shows “Active – can issue licenses” and click the Create Plan button. Your plan is now ready to be assigned to products.
Image
How to Edit a Plan
Go to License Verification → Plans, find the plan you want to change, and click its name to open the edit form. You can change the name, description, duration, max activations, and status.
Editing affects future keys only. If you change the duration from 365 to 730 days, existing license keys that were already generated with the old duration are not changed. Only new keys created after the edit will use the new duration.
Max activations cannot be reduced below the current active license count. If 5 customers already have active licenses from this plan, you cannot set Max Activations below 5 – the system will not allow it, to protect existing customers.
How to Delete a Plan
Open the plan for editing and click the “Delete Plan” button at the bottom. You will be asked to confirm before anything is deleted. A plan can only be deleted if it has no active licenses linked to it. If active licenses exist, you must revoke or expire them first, or wait until they naturally expire.
Deleting a plan removes the plan definition but does NOT delete the license keys that were already generated using that plan. Those keys remain in the system and continue to work until they expire or are manually revoked.
Tips and Best Practices
- Start simple. Begin with two or three plans – for example “Annual Single Site,” “Annual Multi-Site,” and “Lifetime.” You can always add more plans later as your business grows.
- Use descriptive names. You will be choosing from a dropdown list when assigning plans to products. Names like “1yr-1site” are harder to read than “Annual – 1 Site.” Clear names save time.
- Do not delete sample plans if products use them. The three sample plans installed on activation (Starter, Professional, Lifetime) may already be assigned to demo products. Remove those assignments first, then delete the plans.
- Use Inactive instead of Delete when retiring a plan that has existing licenses. This stops new keys from being created without breaking keys that customers already have.
- One plan can be assigned to many different products. For example, if you have 10 different software products that all use a “1 Year / 1 Activation” rule, create one plan and assign it to all 10 products.
Common Mistakes
| Mistake | What Happens | How to Avoid |
|---|---|---|
Setting duration to 0 when you meant 365 days |
Keys become lifetime keys – they never expire, even if the customer only paid for one year |
Double-check the Duration field before saving. 0 means lifetime, 365 means one year |
Setting Max Activations too low |
Customers get locked out when they try to install on a second device |
Think about your typical customer’s use – most individuals need at least 2 activations (home and work) |
Forgetting to assign the plan to a product |
Orders complete but no license key is generated |
After creating a plan, immediately go to Link Plans to Products and assign it to the relevant products |
Making a plan inactive before creating a replacement |
New orders for products using that plan generate no keys |
Create the new plan and update all product assignments before deactivating the old plan |