


Once you have created a license plan, the next step is to connect it to the WooCommerce product your customers will buy. This connection tells the plugin: “When someone buys THIS product, generate a license key using THESE rules.” Without this connection, no license key will be created – even if orders are placed.
Why You Need to Link a Plan
The plugin has no way to know which products should generate license keys unless you tell it. By assigning a plan on the product’s License tab, you are making that product a “licensed product.” From that point forward, every order containing that product will automatically trigger key generation using the plan’s rules.
Real-world example: You sell a product called “Invoice Manager Pro.” You have two plans: “Annual License” (365 days, 1 device) and “Lifetime License” (no expiry, 3 devices). You create two separate WooCommerce products – one for each tier – and assign the matching plan to each one. When a customer buys “Invoice Manager Pro – Annual,” they get an annual key. When they buy the Lifetime version, they get a lifetime key.
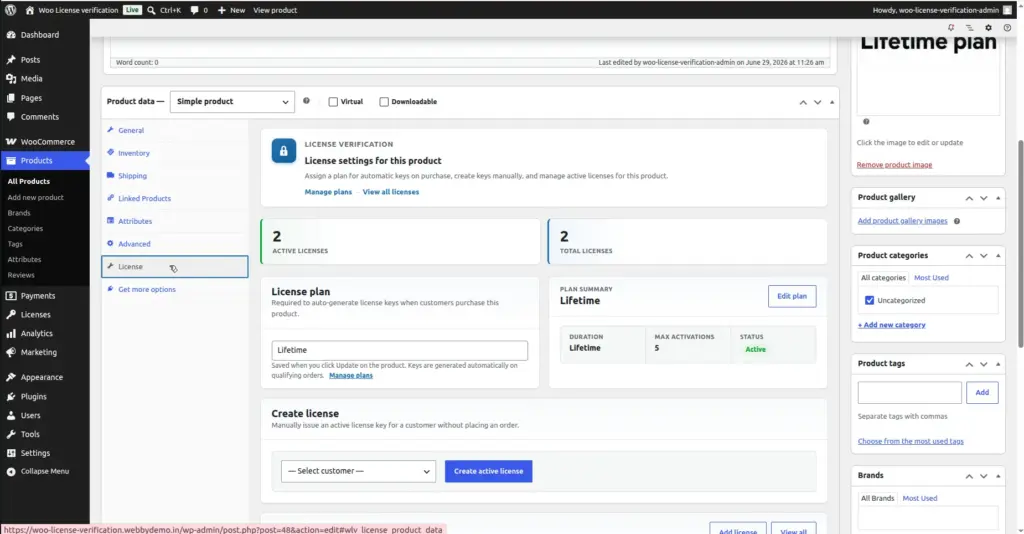
Where to find it: Go to Products in WordPress admin → open or create any product → scroll down to the product data box → click the “License” tab.
License Tab Fields
| Field | What It Does | Example |
|---|---|---|
License Plan |
A dropdown list of all your active plans. Select the plan whose rules should apply when this product is purchased. Select “No plan” to remove the license feature from this product. |
Annual License, Lifetime Plan |
That is the only field on the License tab – it is intentionally simple. All the detailed rules (duration, max activations) live in the plan itself, not on the product.
Step-by-Step: Assigning a Plan to a Product
1. Go to Products in your WordPress admin
Click Products in the left side menu. You will see a list of all your WooCommerce products.
2. Open the product you want to add a license to
Click the product’s name to open it for editing. If you have not created the product yet, click “Add New Product” at the top and set it up as a normal WooCommerce product first (name, price, etc.).
3. Scroll down to "Product data" and click the "License" tab
Below the product description, there is a grey tabbed box called “Product data.” It has tabs like General, Inventory, Shipping, and so on. Click the tab labelled “License” – this tab is added by this plugin and only appears after the plugin is active.
4. Select your plan from the dropdown
You will see a dropdown that lists all your active plans. Click it and select the plan you want to use for this product. If the dropdown shows “No plan,” it means this product will not generate license keys – that is the default for all products until you assign one.
5. Click "Update" or "Publish" to save
Scroll up to the top right of the page and click “Update” (if the product already exists) or “Publish” (if it is a new product). The plan assignment is now saved – any future order containing this product will generate a license key.
Image
Changing or Removing a Plan
You can change the plan assigned to a product at any time. Open the product, go to the License tab, select a different plan from the dropdown, and click Update.
Changing the plan only affects future orders. Any license keys already generated for past orders are not changed – they keep their original plan’s rules (duration, max activations) permanently.
To remove the license feature from a product entirely, open the License tab and select “No plan” from the dropdown. Future orders for this product will no longer generate license keys.
Which Products Can Have a License Plan?
Any standard WooCommerce product can have a license plan assigned to it, including:
- Simple products – the most common type. One plan produces one key per item purchased.
- Variable products – products with variations (like “Basic” and “Pro” versions). You can assign a different plan to each variation so different versions produce different license types.
- Downloadable products – the natural fit for software sales. A customer downloads the software and gets a license key in the same order.
If you sell a product in quantities (for example, a customer buys 3 copies), the plugin creates one license key per unit. An order for 3 copies generates 3 separate license keys, all visible in the order and in the customer’s My Account.
Tips
- After assigning a plan, always place a test order to confirm that a license key is actually generated. Go to License Verification → Licenses and check that the new key appears.
- You can assign the same plan to many different products. If 10 products all use the “Annual 1-Site” plan, assign that one plan to all 10 – no need to create multiple identical plans.
- If you see “No plans available” in the License tab dropdown, it means you have not created any plans yet, or all plans are set to Inactive. Go to License Plans and create or activate a plan first.
- For variable products (products with multiple size/tier options), open the product, go to the Variations tab, and assign a different plan per variation. This allows “Basic = 1 device” and “Pro = 5 devices” on the same product page.