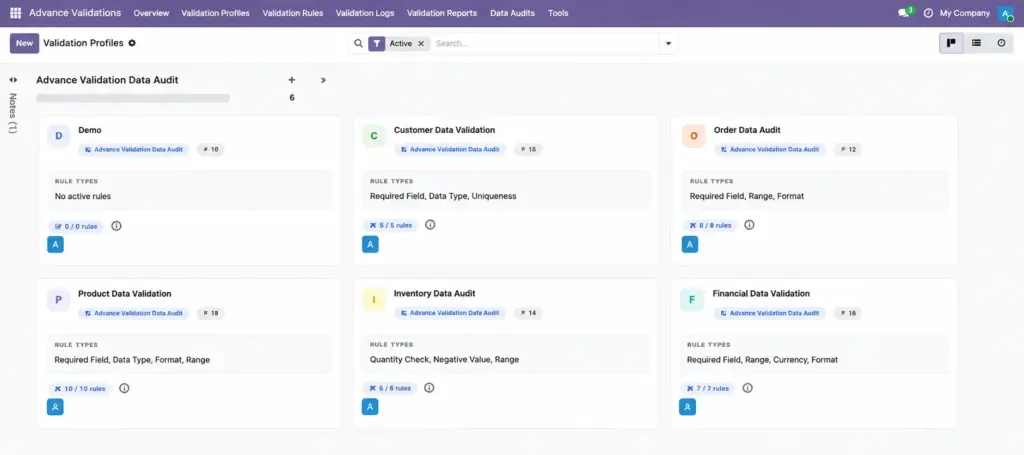
Group your validation rules into organised bundles and assign them to the right teams.
Overview
A Validation Profile is a container that holds a set of related validation rules. Instead of managing dozens of individual rules, you organise them into profiles like “Strict Sales Validation” or “Contact Data Quality.”
Profiles make it easy to enable or disable a whole group of rules at once, assign rules to specific teams, and track performance per business area.
How It Works
Each profile can have a default model (e.g., Contacts or Sales Orders), a list of rules, and optional user/group assignments. When a profile is active, all its active rules run automatically. You can view profiles as colourful cards in a Kanban board, grouped by model.
Step-by-Step Guide
Creating a New Profile
- Go to Advance Validations → Validation Profiles.
- Click New.
- Enter a clear Name (e.g., “Sales Order Checks”).
- Add a Description explaining the profile’s purpose.
- Select a Model if all rules in this profile target the same area.
- Set a Sequence number to control display order (lower numbers appear first).
- Optionally pick a Company for multi-company setups.
- On the Assignment tab, add specific users or groups if this profile should only apply to certain people.
- On the Rules tab, add or link validation rules to this profile.
- Click Save.
Using Profile Actions
- Open Rules – jump to all rules in this profile
- View Today’s Logs – see today’s validation events for this profile
- Test Profile – dry-run all rules against a real record
- Duplicate – copy the profile and its rules as a starting point
- Export – download the profile and rules as a JSON file
Profile Fields
| Field Name | Description | Example |
|---|---|---|
Name |
The profile title shown in lists and Kanban cards |
Contact Data Quality |
Active |
Turn the entire profile on or off |
Checked (active) |
Sequence |
Display order among profiles |
10 |
Description |
Rich text explaining why this profile exists |
Rules for ensuring complete contact records |
Model |
Default target model for rules in this profile |
Contact |
Company |
Limit profile to one company (leave empty for all) |
My Company Ltd. |
Color |
Card colour in the Kanban view |
Blue |
Rules |
List of validation rules belonging to this profile |
Phone Required, Email Format Check |
Active Rule Count |
How many rules are currently active (computed) |
5 |
Blocks Today |
Blocks caused by this profile’s rules today (computed) |
3 |
Warnings Today |
Warnings caused by this profile’s rules today (computed) |
1 |
Field Explanations
Name
Use a business-friendly name that your team will recognise. Avoid technical names like “res.partner rules.”
Model
Optional but helpful. When set, new rules created from this profile automatically default to this model.
Assignment (Users / Groups)
Leave empty to apply rules to everyone. Add specific users or groups to limit the profile – for example, stricter rules for junior sales staff only.
Active Rule Count
Automatically calculated. Shows how many of the profile’s rules are turned on. Inactive rules inside an active profile are skipped.
Blocks / Warnings Today
Live counters for today’s activity. Useful for spotting profiles that cause the most friction.
Tips
- Create one profile per business area – “Sales,” “Purchasing,” “Contacts” – rather than one giant profile for everything.
- Use the Kanban view grouped by Model to see your coverage at a glance.
- Duplicate an existing profile when setting up rules for a new company or department.
- Deactivate a profile temporarily instead of deleting it if you need to pause all its rules during a migration.
Common Mistakes
- Putting unrelated rules in one profile – makes it hard to assign rules to specific teams.
- Forgetting profile assignment – if you add users/groups to a profile, only those people are affected by its rules.
- Deactivating the profile but not checking individual rules – an inactive profile disables all its rules, but standalone rules (without a profile) still run.
Image