


This chapter covers what your customers see and can do with their license keys. The plugin automatically adds a Licenses section to WooCommerce’s My Account area – no extra setup needed. You can also add a public license verification form anywhere on your site using a shortcode.
The My Account Licenses Tab
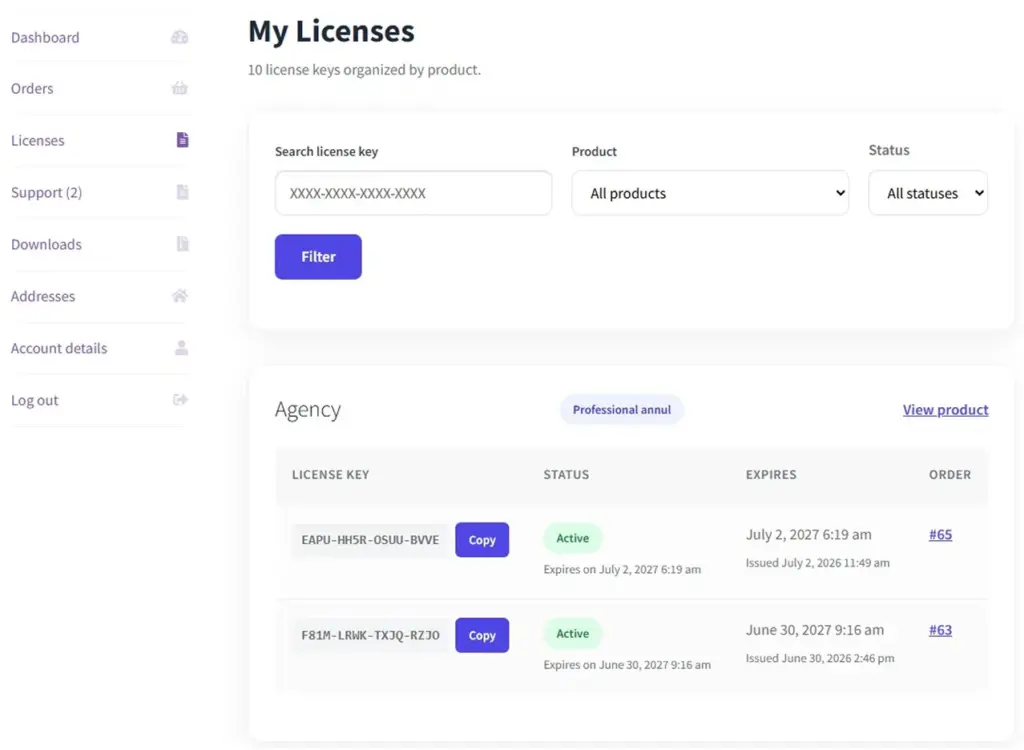
When a customer logs into their account on your WooCommerce site, they will find a “Licenses” tab in the My Account navigation. This tab lists all their license keys in one place – from all their orders, across all products. They can search and filter the list to find a specific key.
| What Customers See | What It Tells Them |
|---|---|
License key |
The actual key string, with a Copy button so they can copy it without typos |
Product name |
Which product or software this key belongs to |
Status badge |
Active, Expired, or Revoked – at a glance they know if the key still works |
Expiry date |
When the key will expire (or “Lifetime” if it never expires) |
Activations used |
How many devices are using this key out of the total allowed (e.g. 1 of 3) |
Order link |
A link back to the original order they purchased |
Image
Public License Verify Form – [wlv_verify_license]
You can place a license verification form on any page of your website – your Contact page, a dedicated “Check My License” page, or a support page. This form is public – anyone can use it, even if they are not logged in.
The customer enters their license key in the form, clicks “Verify,” and immediately sees whether the key is active, expired, or invalid – no login required. This is useful for:
- Customers who forget whether their license is still valid before renewing
- Resellers who need to check a key on behalf of their client
- Your support team who needs to quickly check a key from the front end
How to Add the Verify Form
1. Create or open a WordPress page
Go to Pages → Add New, or open an existing page where you want the form to appear.
2. Add the shortcode to the page content
In the page editor, type or paste this shortcode exactly as shown:
3. Publish or update the page
Click Publish (or Update). When visitors go to that page, they will see a form where they can enter any license key to check its status.
My Licenses List Shortcode – [my_license]
If you want to show the customer’s license list on a custom page (not inside the My Account area), use this shortcode. It shows the same license list as the My Account Licenses tab, but you can embed it anywhere – for example, on a dedicated “Your Software” page.
[my_license]
Optional settings you can add to customise the list:
| Option | What It Does | Example |
|---|---|---|
per_page |
How many license keys to show per page before showing “Next” / “Previous” pagination |
[my_license per_page=”5″] |
show_filters |
Show or hide the search and filter bar above the license list. Set “yes” or “no” |
[my_license show_filters=”no”] |
title |
A heading shown above the list. Leave empty to use the default heading |
[my_license title=”Your Active Licenses”] |
Tips for a Great Customer Experience
- Add a direct link to the My Account Licenses page in your store’s menu or footer. Most customers do not know the Licenses tab exists until you point them to it.
- Create a dedicated “Check Your License” page with the
[wlv_verify_license]shortcode and link to it from your product pages and support documentation. This reduces “Is my license still valid?” support requests significantly. - If a customer says they cannot find their key, ask them to go to My Account → Licenses. Their key is almost certainly there. The most common reason customers “can’t find” their key is that they are checking email instead of My Account.
- The Licenses tab only appears in My Account if the customer has purchased at least one licensed product. Customers who have only bought non-licensed products will not see the tab at all – this is normal behaviour.