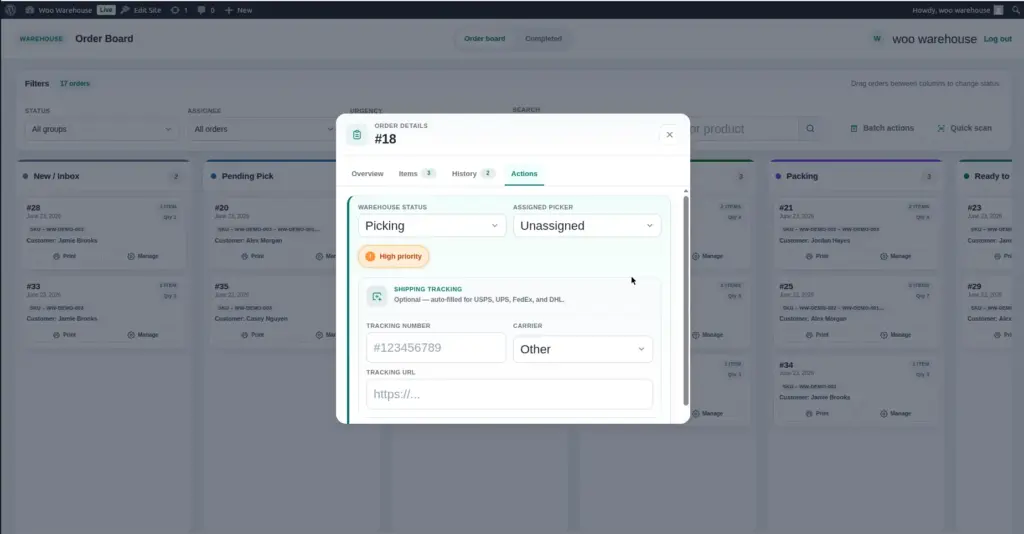
Once an order has been shipped, you can record the carrier and tracking number directly from the order detail panel. The tracking number is saved to the order and creates a one-click link to the carrier’s tracking page – making it easy for your team to confirm delivery status.
How to Add a Tracking Number to an Order
1. Open the order detail panel
On the Order Board, click the order card for the order that has just been shipped to open its detail panel.
2. Find the "Shipping Tracking" section
In the detail panel, scroll to the Shipping Tracking section. You will see two fields: a Carrier dropdown and a Tracking Number text field.
3. Select the carrier from the dropdown
Click the Carrier dropdown and choose the shipping company you used (e.g., USPS, UPS, FedEx, DHL, or Other). The selected carrier determines the format of the tracking URL that is generated.
4. Enter the tracking number
Type or paste the tracking number from the shipping label into the Tracking Number field. For example: 1Z999AA10123456784 (UPS) or 9400111899223407390076 (USPS).
5. Save the tracking information
Click Save or the save button within the tracking section. The tracking number is stored on the order. A clickable tracking link now appears – clicking it opens the carrier’s tracking page in a new browser tab with the tracking number pre-filled.
6. Move the order to "Shipped" status
After saving the tracking number, change the order’s warehouse status to Shipped (or whichever status indicates the order has left your warehouse). This keeps the order visible on the board until it is fully delivered and confirmed complete.
Shipping Fields Reference
| Field | Description | Example |
|---|---|---|
Carrier |
The shipping company that is delivering this parcel. Selected from a dropdown list of configured carriers. Choosing the carrier allows the plugin to construct the correct tracking URL. |
UPS, FedEx, USPS, DHL, Other |
Tracking Number |
The unique parcel tracking number provided by the carrier when you booked the shipment or printed the shipping label. |
1Z999AA10123456784 |
Tracking URL (auto-generated) |
A clickable link that opens the carrier’s tracking page with the tracking number pre-filled. Generated automatically from the carrier and tracking number. You do not type this – it appears after you save. |
ups.com/track?tracknum=1Z999AA1… |
Tracking URL (manual, for “Other” carrier) |
When you select “Other” as the carrier, a manual URL field appears. Paste the full tracking URL here if your carrier provides one. |
https://mycarrier.com/track/ABCD123 |
Default Shipping Carriers
These carriers are configured by default when the plugin is activated. Each has a pre-built tracking URL template so clickable links are generated automatically:
| Carrier Name | Tracking URL Format |
|---|---|
USPS |
Tracking number is inserted into the official USPS tracking link automatically |
UPS |
Tracking number is inserted into the official UPS tracking link automatically |
FedEx |
Tracking number is inserted into the official FedEx tracking link automatically |
DHL |
Tracking number is inserted into the official DHL Express tracking link automatically |
Other |
Requires a manual tracking URL to be entered. Use this for any carrier not in the default list. This carrier option cannot be deleted. |
Adding a Custom Carrier
If you use a shipping company not in the default list – a regional carrier, a local courier, or a freight service – you can add them as a custom carrier in the Settings.
1. Go to Warehouse → Settings → Shipping Carriers
Open the Settings page and find the Shipping Carriers section.
2. Click "Add Carrier"
A new blank row appears in the carriers list.
3. Enter the carrier name
Type the name of the carrier exactly as you want it to appear in the dropdown (e.g., “Australia Post,” “Royal Mail,” “DPD”).
4. Enter the tracking URL template
Find the carrier’s tracking page URL and replace the actual tracking number in the URL with the placeholder %s. For example, if the tracking URL is https://mycarrier.com/track?id=ABCD1234, the template would be https://mycarrier.com/track?id=%s. The plugin replaces %s with the actual tracking number automatically.
5. Click "Save Carriers"
The new carrier now appears in the Carrier dropdown on all order detail panels.
Tips for Shipping & Tracking
- Add the tracking number before moving the order to “Shipped” status. This ensures the tracking information is saved as part of the fulfillment record.
- Use the barcode scanner to look up orders by tracking number if a parcel is returned or has a delivery issue. See Barcode Scanning.
- Double-check the tracking number before saving – typos in tracking numbers create invalid links. Copy-paste from the carrier’s software or label printer when possible.
- If you use “Other” as the carrier, always paste the full tracking URL. Without a URL, the tracking link is not generated and cannot be clicked.
Image