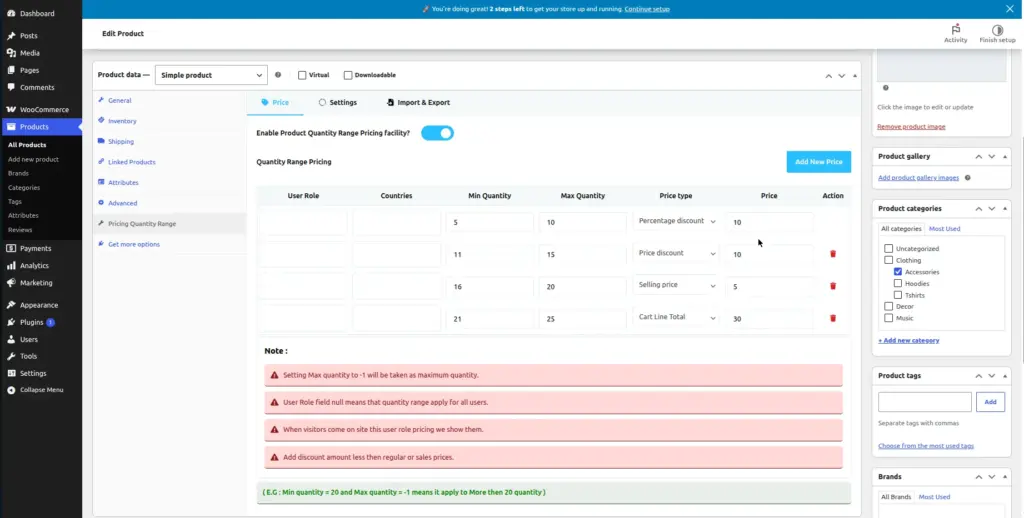
This chapter shows you how to add quantity-based pricing tiers directly to individual products. This is the heart of the plugin – where you decide exactly how much discount a customer gets when they buy more.
Overview
Each product in WooCommerce has an edit screen. After installing this plugin, a new tab called “Quantity Range Pricing” appears in the Product Data panel at the bottom of the edit screen. This is where you add your pricing rows.
A pricing row defines: “If a customer buys between X and Y items, apply this discount.” You can add as many rows as you need to create multiple pricing tiers.
Real Example: For a T-shirt priced at $50:
Note: Max Qty of -1 means “unlimited” – this tier applies for any quantity above 25.
Where to Find It on a Product
Go to Products → All Products
In your WordPress admin sidebar, hover over “Products” and click “All Products” to see your full product list.
Click Edit on any product
Hover your mouse over any product name and click the “Edit” link that appears underneath it.
Scroll down to Product Data
Scroll down the product edit page until you see a section called “Product Data” – it has multiple tabs like General, Inventory, Shipping, etc.
Click the "Quantity Range Pricing" tab
You will see a new tab added by this plugin. Click it to open the pricing configuration area.
Adding a Pricing Rule
Enable pricing on this product
At the top of the Quantity Range Pricing tab, you will see a toggle: “Enable Product Quantity Range Pricing facility?” Turn it ON. The pricing table area will appear below.
Click "Add New Price"
A button labelled “Add New Price” appears. Click it to add your first pricing row. A new row will appear in the table below.
Fill in the fields for each row
Each row has these fields: User Role, Countries, Min Quantity, Max Quantity, Price Type, and Price. Fill these in based on the table below.
Add more rows for more tiers
Click “Add New Price” again to add another tier. Repeat for as many quantity ranges as you need.
Click Update (Save the product)
Scroll to the top of the product page and click the blue “Update” button to save all your pricing rules.
Pricing Row Fields Explained
| Field | Required? | What to Enter |
|---|---|---|
User Role |
Optional |
Leave blank to apply to all customers. Or select a specific role (e.g. Wholesale Buyer) to only show this price to that group. |
Countries |
Optional |
Leave blank to apply globally. Or select specific countries for this price tier. |
Min Quantity |
Required |
The minimum number of items a customer must add to cart for this price to apply. Example: 10 |
Max Quantity |
Required |
The maximum items for this price. Use -1 to mean “no limit” (this tier applies for all quantities above the minimum). |
Price Type |
Required |
How the discount is calculated. See User Roles & Country Pricing for a full explanation of each type. |
Price |
Required |
The discount amount. If Price Type is Percentage, enter the percentage (e.g. 20 for 20% off). If fixed, enter the amount. |
Tips
- Set Max Qty to
-1for your highest tier – this ensures the discount applies for any large order, no matter how big. - Your Min Qty for the next tier should be one more than the previous Max Qty (e.g. if Max is 9, next Min should be 10).
- Leave User Role and Countries empty unless you need different prices for different groups.
- Always click the “Update” button on the product page after adding or editing pricing rows.
Common Mistakes
- Forgetting to enable the toggle on the product. The global setting and the product-level toggle are separate. You must turn on the toggle on each product you want pricing on.
- Overlapping quantity ranges. If one row says Min=5, Max=10 and another says Min=8, Max=15 – they overlap at 8–10. This causes confusion. Make sure ranges do not overlap.
- Clicking “Add New Price” but not filling in the fields. Empty rows will be saved but won’t work. Always fill in all required fields before saving.
Image