


The Global Settings page is the master control panel for the entire plugin. Settings you configure here apply to all products across your store, unless overridden at the product level.
Where to find it: In your WordPress admin sidebar, go to Quantity Range Pricing → Settings. This is where you configure everything at a site-wide level.
Overview
Think of Global Settings as the default rules that apply to your entire store. For example, if you set the display style to “Table” here, all products will show a table – unless you specifically override it on an individual product. This saves you from repeating the same settings hundreds of times.
General Settings
| Setting | Options | What It Does |
|---|---|---|
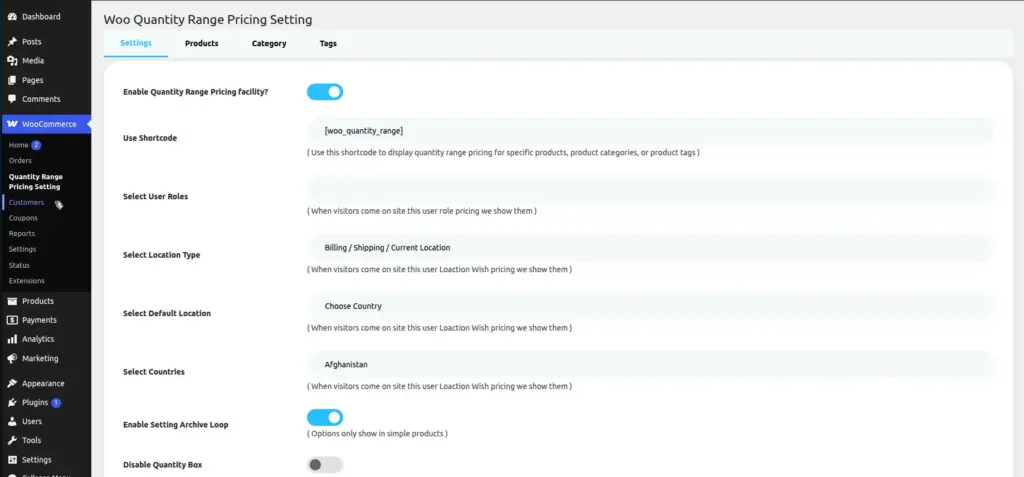
Enable Quantity Range Pricing |
On / Off |
The master switch. Turn this ON to activate pricing tables on your store. Turn OFF to hide all pricing tables sitewide without deleting your rules. |
Enable Archive Loop |
On / Off |
When ON, the pricing table appears on your Shop page and category listing pages too, not just on individual product pages. |
Disable Quantity Box |
On / Off |
When ON, the standard WooCommerce quantity input box is hidden from product pages. Useful if you want customers to select quantity only from the pricing table. |
Select User Roles |
Multiple roles |
Limit who can see the pricing table. Leave blank to show to everyone. Select specific roles (e.g. Wholesale) to restrict visibility. |
Image
Display Settings
| Setting | Options | What It Does |
|---|---|---|
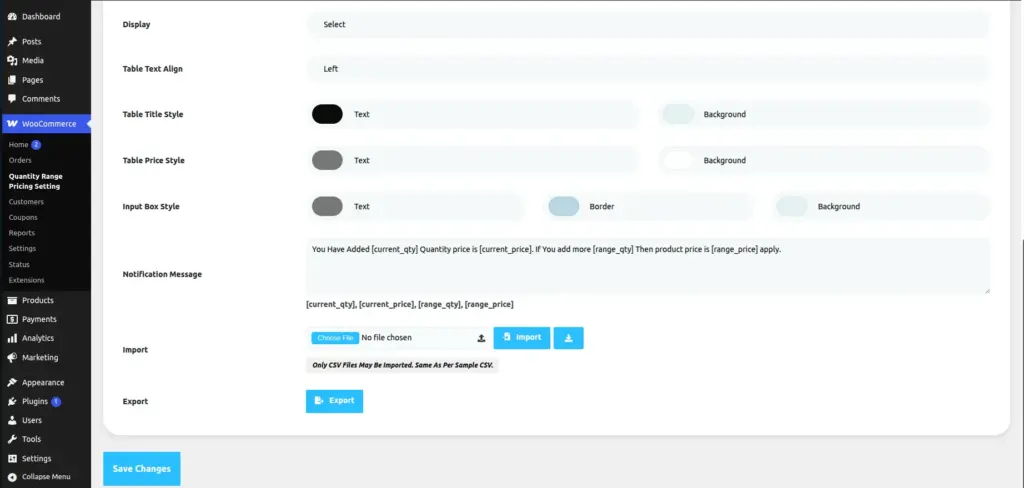
Display Style |
Table / Radio / Dropdown |
How the pricing options are shown to customers. Table is most common. Radio shows clickable buttons. Dropdown shows a select box. |
Table Text Align |
Left / Center / Right |
Controls how text is aligned inside the pricing table cells. |
Table Title Style |
Text Color + Background Color |
Customize the header row colors of the pricing table (the row that says “Quantity”, “Price”, etc.) |
Table Price Style |
Text Color + Background Color |
Customize the color of the pricing rows (the rows showing the actual discounts). |
Table Border Style |
Size + Style + Color |
Control the border around the table – thickness, style (solid/dashed), and color. |
Input Box Style |
Text / Border / Background Color |
Style the quantity input box that appears next to the pricing table. |
Image
Step-by-Step: Configure Global Settings
Go to Quantity Range Pricing → Settings
Click on the plugin’s menu in the left sidebar, then click Settings.
Turn on the master switch
Find “Enable Quantity Range Pricing facility?” and turn it ON. Without this, nothing will appear on your store.
Choose your display style
Select Table, Radio, or Dropdown for how pricing is shown. Most stores start with Table as it’s clearest for customers.
Set your table colors
IIf your store has a brand color, use it for the table header background. This makes the pricing table look professional and on-brand.
Click Save Changes
Always click Save Changes at the bottom of the page. Changes do not apply until saved.
Always click Save Changes at the bottom. Navigating away without saving will lose your changes.
Tips
- Start with Global Settings to set your store-wide defaults, then fine-tune individual products if needed.
- Use your store’s primary brand color for the table header to keep pricing tables looking consistent.
- If you only want wholesale customers to see pricing, select the “Wholesale” role in the User Roles setting.
- You can override any Global Setting on a per-product basis – individual product settings always take priority.