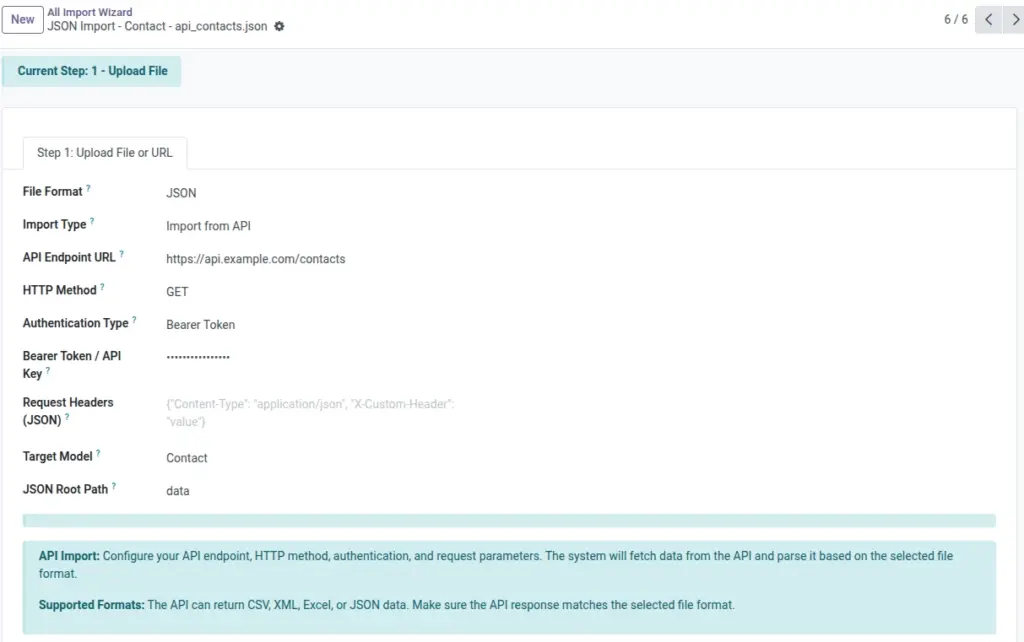
This is where you tell Odoo what you’re importing (Target Model) and where your data comes from (a file upload, a URL, or an API).
Overview
Think of an “Import” as a saved recipe for bringing data into Odoo. It stores: the file type (CSV/XML/Excel/JSON), where the data comes from (Upload/URL/API), and which Odoo screen you want to fill (Target Model).
Use this page when you are starting a new import or when you want to double-check that you selected the correct file, link, or API before you continue to field mapping.
What “success” looks like on this step After you set the format + import type + target model and save, the wizard is ready to show your Source Fields so you can map them.
Real-life example You received a spreadsheet of new customers. You choose the “Contacts” screen as the Target Model, upload the Excel file, and later match columns like “Email” → “Email”.
How It Works
The wizard reads your data and creates a list of “Source Fields” (your columns / keys / XML elements). In the next step, you match those source fields to Odoo fields.
Why this step matters If you pick the wrong Target Model, your data won’t land where you expect. Always confirm you are on the right Odoo screen first.
Step-by-Step Guide
Open the Import Wizard
- In Odoo: Odoo All import → All Imports then click Create.
Choose your File Format
- Pick one: CSV, XML, Excel, or JSON.
Choose the Import Type
- Upload File: you select a file from your computer
- Import from URL: you paste a public link to a file
- Import from API: you connect to an API endpoint
Select the Target Model
- This is the Odoo screen you want to fill. Example: Contacts, Products, Sales Orders, etc.
Set format details (only if needed)
- CSV: delimiter (comma/semicolon/pipe/tab) and “Has Header Row”
- XML: root element name (optional)
- Excel: sheet name (optional)
- JSON: root path (optional)
Save
- The wizard will load your data and move you to field matching (Step 2) when it has enough information.
Fields Table
| Field Name | Description | Example |
|---|---|---|
File Format |
Which type of file you are importing. |
CSV |
Import Type |
Where the data comes from: a file, a URL, or an API. |
Upload File |
Target Model |
The Odoo screen you want to fill (Target Model). |
Contacts |
Upload File |
Your uploaded file (depends on file format). |
customers.xlsx |
Import from URL |
A public link where the wizard can download the file. |
https://example.com/customers.csv |
API Endpoint URL |
The API endpoint to fetch data from. |
https://api.example.com/customers |
HTTP Method |
How the API is called (GET/POST/PUT/PATCH). |
GET |
Authentication Type |
The type of login used for the API. |
Bearer Token |
Request Headers (JSON) |
Extra headers (written as JSON text). |
{ “Content-Type”: “application/json” } |
Request Body (JSON) |
Body for POST/PUT/PATCH (written as JSON text). |
{ “since”: “2026-01-01” } |
Delimiter |
How CSV columns are separated. |
, |
Has Header Row |
Whether the first row contains column names (CSV). |
Yes |
XML Root Element |
The XML element that represents one row/record (optional). |
record |
Excel Sheet Name |
Which Excel sheet to import (optional). |
Sheet1 |
JSON Root Path |
Where the list of records is inside a JSON response (optional). |
data.items |
File Name |
Displayed name of the chosen source. |
imported_from_url.csv |
Field explanations (what users should know)
This section explains every field shown in the Fields Table above.
- File Format Choose the type of data you have. Pick CSV when your data is comma/semicolon separated text, Excel when you have an .xlsx file, JSON for data from many apps/APIs, and XML for structured XML files.
- Import Type Choose where the data comes from: Upload File (from your computer), Import from URL (a public link), or Import from API (connect to another system).
- Target Model This decides which Odoo screen will receive the data. Example: Contacts for customers, Products for items, etc. If this is wrong, the rest of your mapping will feel “off”.
- Upload File Attach the file that contains your data. The upload field changes based on the File Format you selected.
- Import from URL Paste a link that points directly to the file. The link must be public and should download/open the real file (not a login page).
- API Endpoint URL This is the address of the API you are pulling data from. If you don’t use APIs, you can ignore this.
- HTTP Method Usually GET is used to fetch data. Use POST/PUT/PATCH only if your API provider tells you to.
- Authentication Type Choose how the API identifies you. Common choices are No Authentication, Basic (username/password), Bearer Token, or API Key.
- Request Headers (JSON) Optional. Extra information sent to the API, written as JSON text. Only add this if your API provider requires it.
- Request Body (JSON) Optional. Used mainly for POST/PUT/PATCH. It can include parameters like date range filters.
- Delimiter Only for CSV. If your CSV looks like
name;email, use;. If it looks likename,email, use,. “tab” is used for tab-separated files. - Has Header Row Only for CSV. Turn this on if the first row contains column names like “Name, Email, Phone”. Turn it off if the first row is already real data.
- XML Root Element Only for XML. This tells the wizard what XML element represents one record (one “row”). Leave it empty if you’re not sure — the wizard can auto-detect in many cases.
- Excel Sheet Name Only for Excel. If your workbook has multiple sheets, type the sheet name you want. Leave empty to use the first sheet.
- JSON Root Path Only for JSON. Use this when the records are inside a nested object. Example: if the JSON is
{"data":{"items":[...]}}, the root path could bedata.items. Leave empty if the JSON is already a list like[{...},{...}]. - File Name This is a helpful display name. It lets you confirm you’re working on the right import configuration.
Tips
- Start small first: test with 5–10 rows before importing thousands.
- Use clear column names: “Email”, “Phone”, “Company” map easier than “Field1”, “Field2”.
- If using URL: ensure the link is public and opens the real file (not a login page).
Common Mistakes
Mistake: URL points to a web page, not a file If the URL opens a website (HTML) instead of a direct CSV/Excel file, the import may fail or load wrong data.
Mistake: Wrong Target Model If you pick the wrong screen, fields won’t match and your data won’t appear where you expect.
Image