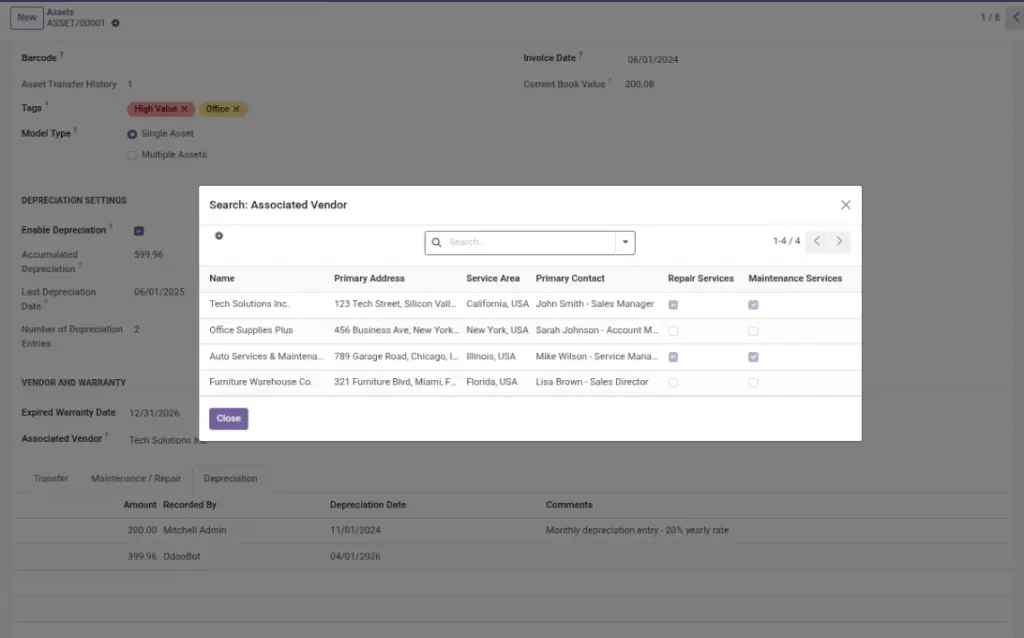
Vendors are the companies you buy from or send assets to for repairs and maintenance. Keeping vendor details up to date saves time when creating assets and maintenance entries.Overview
Overview
Go to Asset → Vendors to view and manage your vendor list. Vendors can be used in:
- Asset records (who supplied the asset)
- Maintenance records (who serviced the asset)
How it works
- Create vendors once and reuse them.
- Mark whether a vendor offers repair and/or maintenance services.
- Keep a primary contact so your team knows who to call.
Why this matters: when reporting by vendor, clean vendor data gives you accurate charts and cost summaries.
Step-by-step guide
Create a vendor
Go to Asset → Vendors and click Create.
Add contact details
Fill name, address, service area, contact person, phone, and email.
Mark service capabilities
Turn on Repair Services and/or Maintenance Services if the vendor provides them.
Use the vendor in assets and maintenance
Select this vendor while creating/updating an asset or a maintenance entry.
Fields table
| Field Name | Description | Example |
|---|---|---|
Name |
Vendor company name. |
Tech Solutions Inc. |
Primary Address |
Main business address. |
123 Tech Street, CA |
Service Area |
Where the vendor operates. |
California, USA |
Primary Contact |
Main person you contact. |
John Smith (Sales Manager) |
Contact Phone |
Phone number for quick calls. |
+1‑555‑0123 |
Contact Email |
Email for quotes and invoices. |
|
Repair Services |
Does this vendor do repairs? |
Yes |
Maintenance Services |
Does this vendor do planned maintenance? |
Yes |
Additional Services |
Other useful services the vendor offers. |
Yes |
Field explanation
| Field Name | Explanation |
|---|---|
Name |
Official vendor company name used across assets and maintenance entries. |
Primary Address |
Vendor’s main address for deliveries, returns, and paperwork. |
Repair Services vs Maintenance Services |
Repair = fix issues; Maintenance = planned service to prevent issues. |
Service Area |
Geography the vendor supports; helps you pick nearby vendors for urgent work. |
Primary Contact |
Main person for coordination (name and role help your team reach the right person). |
Contact Phone |
Number used for quick calls, escalations, and follow-ups. |
Contact Email |
Address used for quotes, approvals, and receiving invoices. |
Additional Services |
Handy flag for other offerings you might need (e.g., installation, disposal). |
Tips
- Keep one vendor per company (avoid duplicates like “Tech Solutions” and “Tech Solutions Inc.”).
- Use a shared format for phone and email so your team can copy/paste easily.
- Update contacts when the vendor changes account managers.
Common mistakes
- Creating duplicates: it splits reports and makes data messy.
- Leaving contact fields blank: your team wastes time searching emails and old invoices.
- Not marking capabilities: you may pick the wrong vendor for a repair job.
Image placeholder