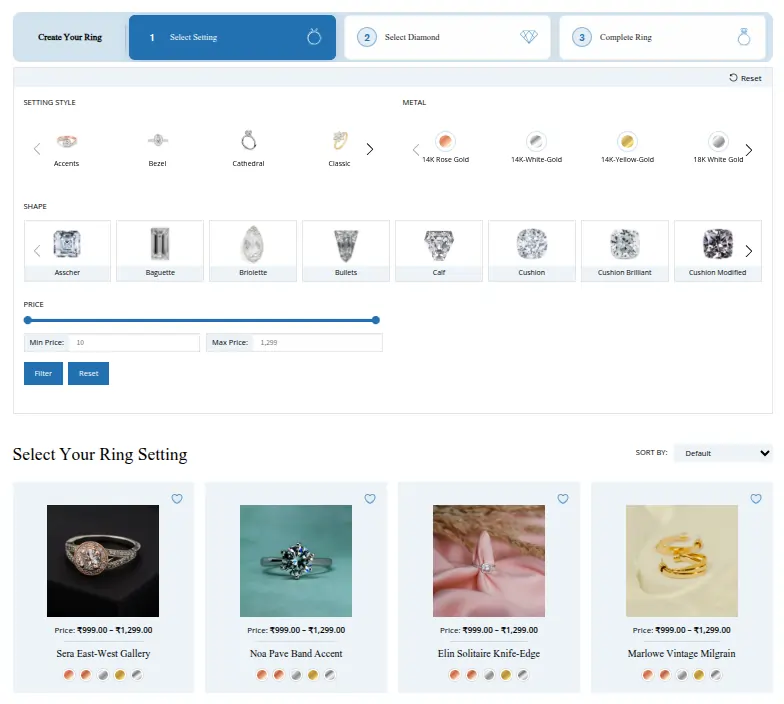
The Ring Builder is the centerpiece of the plugin – a guided 3-step shopping experience where customers choose a ring setting, pick a diamond or gemstone, and complete their custom ring purchase. This chapter explains how the builder works and how you manage the ring products behind it.
How the Ring Builder Works
The ring builder is a 3-step journey customers follow on your website. The steps are shown in a visual progress bar at the top of the builder page. Customers can move forward and backward through the steps freely.
Step 1 – Choose a Setting
The customer browses all available ring settings (the WooCommerce variable products you set up). They filter by metal type, style, accent stones, and setting carat weight. Each card shows the ring image, name, and price. Clicking a card selects that ring and moves to Step 2.
Step 2 – Choose a Diamond or Gemstone
The customer picks whether they want a diamond or a gemstone, then uses the advanced filter panel to narrow results by shape, cut, color, clarity, carat range, price range, lab certificate, and more. They click on any stone card to select it and proceed to the review.
Step 3 – Review & Purchase
A final summary shows the chosen ring, the chosen stone, and the combined price. The customer can add the complete custom ring to their WooCommerce cart. If the Add to Cart button is disabled in settings, they see a “Contact Us” option instead.
Builder URL Paths
The ring builder works through virtual URL paths – no WordPress pages need to be created. The paths are:
| URL Path | What Opens |
|---|---|
/ring-builder/ |
The full 3-step Ring Builder (ring selection → stone selection → review) |
/ring-builder/diamond-builder/ |
Standalone diamond browsing – customers can browse and filter diamonds without selecting a ring first |
/ring-builder/gemstone-builder/ |
Standalone gemstone browsing page |
/ring-builder/purchase-review/ |
The final review/cart page (reached automatically from Step 2) |
You can change these URL slugs by going to Settings → Permalinks in WordPress and finding the “Jewelry Builder” slug section. After changing slugs, always click Save Changes on the Permalinks page to apply the update.
Ring Products – The Settings
The “ring settings” customers choose in Step 1 are standard WooCommerce variable products. The plugin uses five specific product attributes to power the ring filters. These attributes are created automatically when the plugin is activated.
| WooCommerce Attribute | What It Filters | Example Values |
|---|---|---|
|
The metal type of the ring band |
14K Yellow Gold, 14K White Gold, 18K Rose Gold, Platinum |
|
The overall ring design style |
Solitaire, Halo, Pave, Three Stone, Vintage, Modern |
|
Whether the ring has side stones and their type |
No Accent Stones, Diamond Accents, Gemstone Accents |
|
The total carat weight of accent/side stones in the setting |
0.10 ct, 0.25 ct, 0.50 ct, None |
|
The center stone shape the ring is designed for |
Round, Princess, Oval, Cushion, Pear, Emerald |
Adding or Editing Ring Products
Go to Products → All Products
In your WordPress admin, click WooCommerce → Products → All Products. The 30 demo ring products created by the setup wizard are listed here. They are named with patterns like “Solitaire Ring 1,” “Halo Ring 2,” etc.
Click "Edit" on a Ring Product
Open any ring product to edit it. These are standard WooCommerce variable products, so they use the normal WooCommerce product editor.
Upload Real Product Images
Replace the placeholder product image with a real photo of the ring setting. Add additional gallery images if you have multiple angles. High-quality photos (at least 800×800 pixels) are recommended.
Set the Product Attributes
In the “Product data” box, go to the Attributes tab. Make sure the five builder attributes (Metal, Style, Accent Stones, Setting Carat Weight, Shapes) are set correctly for this ring. These drive the Step 1 filter results.
Set Pricing on Each Variation
In the Variations tab, set a price for each variation of the ring (e.g., 14K Yellow Gold vs 14K White Gold). This is the ring setting price – the stone price is added on top of this in the final review step.
Publish the Product
Click “Update” or “Publish” to save. The ring will appear in the builder’s Step 1 ring selection grid immediately.
Tips for a Great Ring Builder Experience
Best practices
- Use square product images(1:1 ratio) for ring photos so they display consistently in the grid without cropping or stretching.
- Assign the correct Shapes attribute to each ring so the shape filter in Step 2 carries forward – customers who filter for “Round” diamonds in Step 2 will only see rings compatible with round stones.
- Keep your ring prices as the setting price only. The diamond/gemstone cost is added automatically at the review step.
- Add a Ring Size Chart PDF in Plugin Settings so customers can check their size before completing the purchase.
- Use the Steps Layout setting to pick a visual style that matches your store branding – preview all 5 options before deciding.
Image